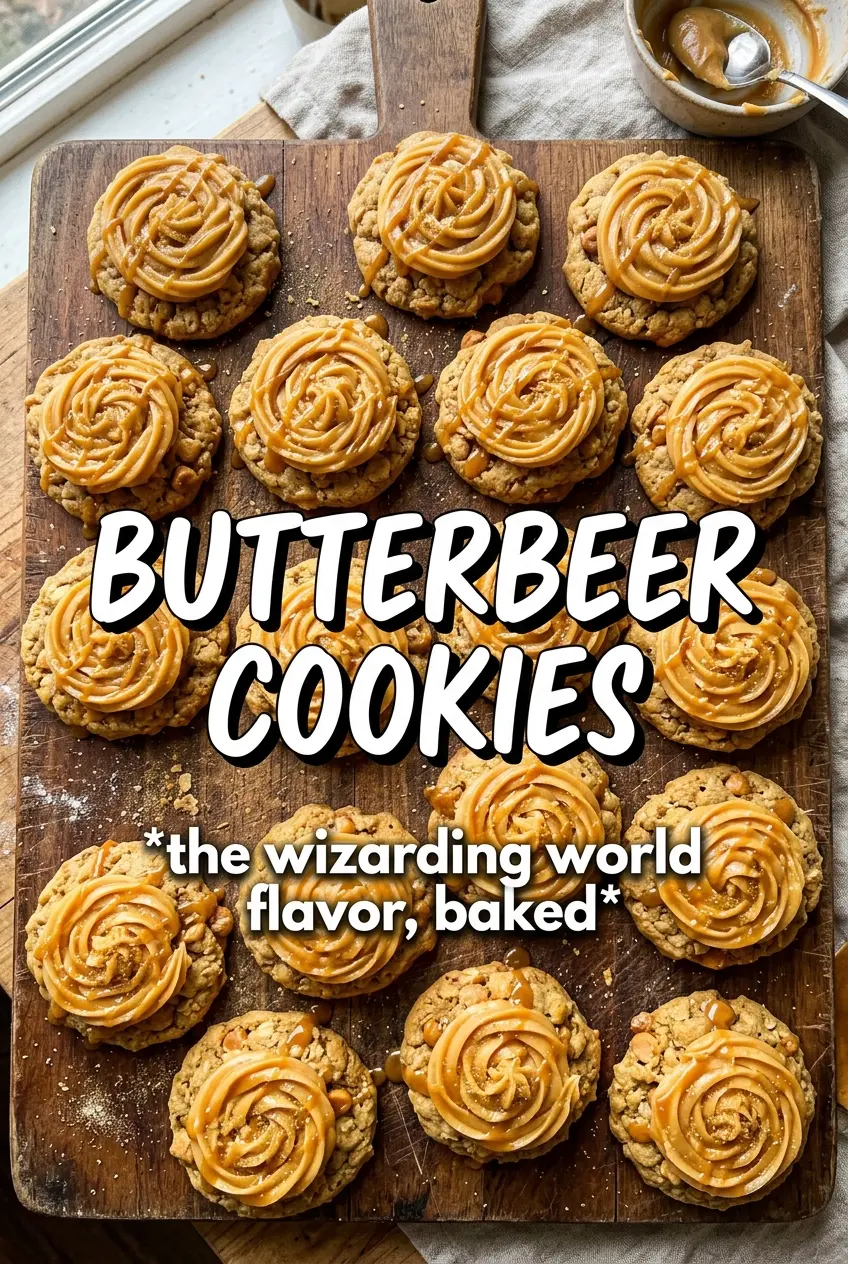
Butterbeer cookies bake up soft in the center with lightly crisp edges and a deep butterscotch aroma that carries all the way through the frosting. The cookie itself tastes like a cross between a brown sugar drop cookie and a bakery-style treat, but the butterscotch chips and cream cheese frosting push it into something richer and more playful. That caramel drizzle on top isn’t just decoration either; it ties the whole cookie together and gives each bite a little extra sweetness without making it cloying.
What makes this version work is the balance of extracts and the way the dough is handled. Butter extract gives the cookie that warm, rounded flavor people associate with butterbeer, while the butterscotch extract keeps it from tasting like a plain sugar cookie with chips mixed in. The dough bakes best when it stays slightly underworked and the cookies come out the moment the edges set, because they finish firming up on the pan. For the frosting, softened cream cheese and butter beat into a pipeable swirl that sits beautifully on a cooled cookie instead of sliding off.
Below, I’m walking through the ingredient choices, the baking cues that matter, and a few smart swaps if you need to adjust the recipe without losing that butterscotch-forward flavor.
The cookies stayed soft for days and the butterscotch frosting piped on perfectly once everything was completely cool. The caramel drizzle was the part my kids noticed first.
Save these butterbeer cookies with butterscotch frosting for the soft centers, creamy swirl, and caramel finish.
The Detail Most Cookie Recipes Miss: Cooling Before the Frosting Goes On
The cookies need to be fully cool before you pipe the frosting, and not just “mostly” cool. Warm cookies melt the cream cheese frosting into a slidey mess, and that caramel drizzle will disappear into the surface instead of sitting in neat ribbons. These cookies are meant to stay soft, so the trick is giving them enough time to set without overbaking them into dry little pucks.
The other place people go wrong is pulling them too early because they look pale in the center. Butterbeer-style cookies should be taken out when the edges are set and the tops no longer look wet. They keep cooking from the sheet pan’s residual heat, which is exactly how you get a tender middle without losing structure.
- Butter extract — This is the ingredient that gives the cookie that nostalgic, buttery flavor. Vanilla works if that’s what you have, but the result is softer and less distinct. If you use vanilla, the butterscotch extract becomes more important.
- Butterscotch extract — This does the heavy lifting for the butterbeer-style flavor. There isn’t a true one-to-one substitute, but caramel extract can work in a pinch with a slightly sweeter, less rounded result.
- Butterscotch chips — These add little pockets of melted sweetness and help the cookie taste more layered. If you swap in chocolate chips, you’ll get a completely different cookie. White chocolate is the closest backup if you want sweetness without overpowering the extract flavor.
- Cream cheese — This keeps the frosting tangy enough to balance the sweetness of the cookie and the caramel drizzle. Use full-fat cream cheese for the best texture; low-fat versions can turn loose and grainy when beaten with powdered sugar.
What Each Ingredient Is Actually Doing in This Recipe

- Primary ingredient (the star) — Quality matters most. Choose the best you can find.
- Cooking medium (oil, butter, or broth) — This carries flavors and prevents dryness.
- Seasonings (salt, pepper, spices, herbs) — Layer flavors so nothing overpowers. Build depth gradually.
- Aromatics (garlic, onion, herbs) — Cook with fat to bloom flavors. Become the foundation.
- Supporting ingredients — Complement the main ingredient without overpowering it.
- Sauce or liquid (if applicable) — Brings flavors together. Balance richness with acid.
- Acid (lemon, vinegar, wine, or other) — Brightens and prevents flat-tasting results.
- Final finish (garnish, glaze, or sauce) — Prevents one-dimensional taste and adds visual appeal.
Building the Dough, Baking the Centers, and Finishing the Frosting
Mix the Butter and Sugars Until the Bowl Looks Fluffy
Beat the softened butter with both sugars until the mixture looks pale and aerated, not just combined. That extra minute or two traps air and gives the cookies a lighter bite. If the butter is too cold, the mixture stays gritty; if it’s melted, the cookies spread too much and lose that soft center.
Fold in the Flour Just Until the Streaks Disappear
Once the eggs and extracts go in, add the dry ingredients and stop as soon as the flour disappears. Overmixing builds too much gluten and makes the cookies tougher than they should be. The dough should look thick and a little sticky, with the butterscotch chips evenly dispersed throughout.
Watch for Set Edges, Not a Deep Brown Top
Scoop the dough into 2-tablespoon mounds and bake until the edges look set and the tops have turned lightly golden. The centers may still look soft, and that’s right where you want them. If the cookies bake until they look fully done in the oven, they’ll end up dry after cooling.
Pipe the Frosting on a Fully Cooled Cookie
Beat the cream cheese, butter, butterscotch sauce, powdered sugar, and vanilla until smooth and thick enough to pipe. If the frosting seems loose, chill it for 10 minutes instead of adding more sugar right away; extra sugar can make it cloying and grainy. Pipe a generous swirl onto each cooled cookie, then finish with caramel drizzle and a butterscotch chip on top.
How to Tweak These Cookies Without Losing the Butterscotch Core
Make Them Gluten-Free
A good 1:1 gluten-free baking blend will work here, especially one that includes xanthan gum. The cookies may spread a little less and feel slightly more delicate, but the butterscotch flavor still comes through clearly. Let the dough rest for 10 minutes before baking so the flour has time to hydrate.
Swap the Frosting for a Thicker Glaze
If you want a cleaner finish, skip the piping and whisk the frosting into a spreadable glaze with an extra spoonful of butterscotch sauce or a little milk. It won’t have the same bakery-style height, but it’s easier to stack and transport. The flavor stays rich, just less creamy.
Use Vanilla Instead of Butter Extract
Vanilla works fine if butter extract isn’t in your cabinet, but the cookies will taste a little less like the name suggests. In that case, lean into the butterscotch extract and don’t skip the caramel drizzle. You’ll still get a warm, dessert-shop flavor, just with a softer finish.
Storage and Reheating
- Refrigerator: Store frosted cookies in a single layer or with parchment between layers for up to 4 days. The frosting stays set, but the cookie softens a little more each day.
- Freezer: Freeze the unfrosted cookies for up to 2 months. Thaw at room temperature, then frost after they’re fully defrosted for the best texture.
- Reheating: These aren’t meant to be reheated once frosted. If you want that fresh-baked feel, warm an unfrosted cookie for a few seconds and frost it afterward; microwaving a frosted cookie melts the topping and ruins the swirl.
Answers to the Questions Worth Asking
Butterbeer Cookies With Butterscotch Frosting
Ingredients
Equipment
Method
- Preheat the oven to 375F and line baking sheets with parchment, keeping the sheets ready to go for scooping. The oven should be fully heated before you bake.
- Whisk the all-purpose flour, baking soda, and salt together until the mixture looks evenly speckled. This ensures consistent lift and seasoning.
- Beat the unsalted butter and both sugars until fluffy, about 2 to 3 minutes. The mixture should look lighter in color and hold some air.
- Add the eggs, butter extract or vanilla extract, and butterscotch extract, then beat just until incorporated. Stop as soon as the batter looks smooth and cohesive.
- Fold the flour mixture into the wet ingredients until no dry streaks remain. Keep mixing gentle so the dough stays tender.
- Fold in the butterscotch chips evenly through the dough. You should see chips distributed throughout the dough.
- Scoop the dough into 2-tablespoon rounds and place them on the lined baking sheets with space between. Aim for even mounds so they bake uniformly.
- Bake at 375F for 10 to 12 minutes, until the cookies are golden around the edges. They should look set and slightly puffed.
- Cool the cookies completely before frosting. The surface should feel room-temperature so the frosting holds its shape.
- Beat the cream cheese, unsalted butter, butterscotch sauce, powdered sugar, and vanilla until smooth and thick. The frosting should be pipeable and glossy.
- Pipe a generous swirl of butterscotch frosting onto each fully cooled cookie. Cover the top with a visible mound so each cookie gets a thick layer.
- Drizzle caramel sauce over the frosted cookies, then add a butterscotch chip on top. The finishing toppings should sit neatly without sinking into the frosting.