Golden, crisp taco cups change the whole mood of a party platter. Instead of a soft taco that falls apart in your hand, you get a sturdy, crunchy shell filled with seasoned beef, melted cheese, and cool toppings that stay in place long enough to actually eat. The best part is the texture contrast: the wrapper bakes into a little edible bowl, and the hot filling softens the cheese just enough without turning the bottom soggy.
The trick is to bake the shells before they ever meet the meat. That first bake gives you the shattering edges and keeps the cups from collapsing once the filling goes in. Wonton wrappers make the neatest, crispest base, but small tortilla pieces work too if you press them firmly into the muffin tin and let the edges stand up a bit.
These are the kind of appetizer that disappears fast, so I’ve included the timing cue that keeps the shells crisp, along with a few smart swaps if you want to make them lighter, spicier, or easier to prep ahead.
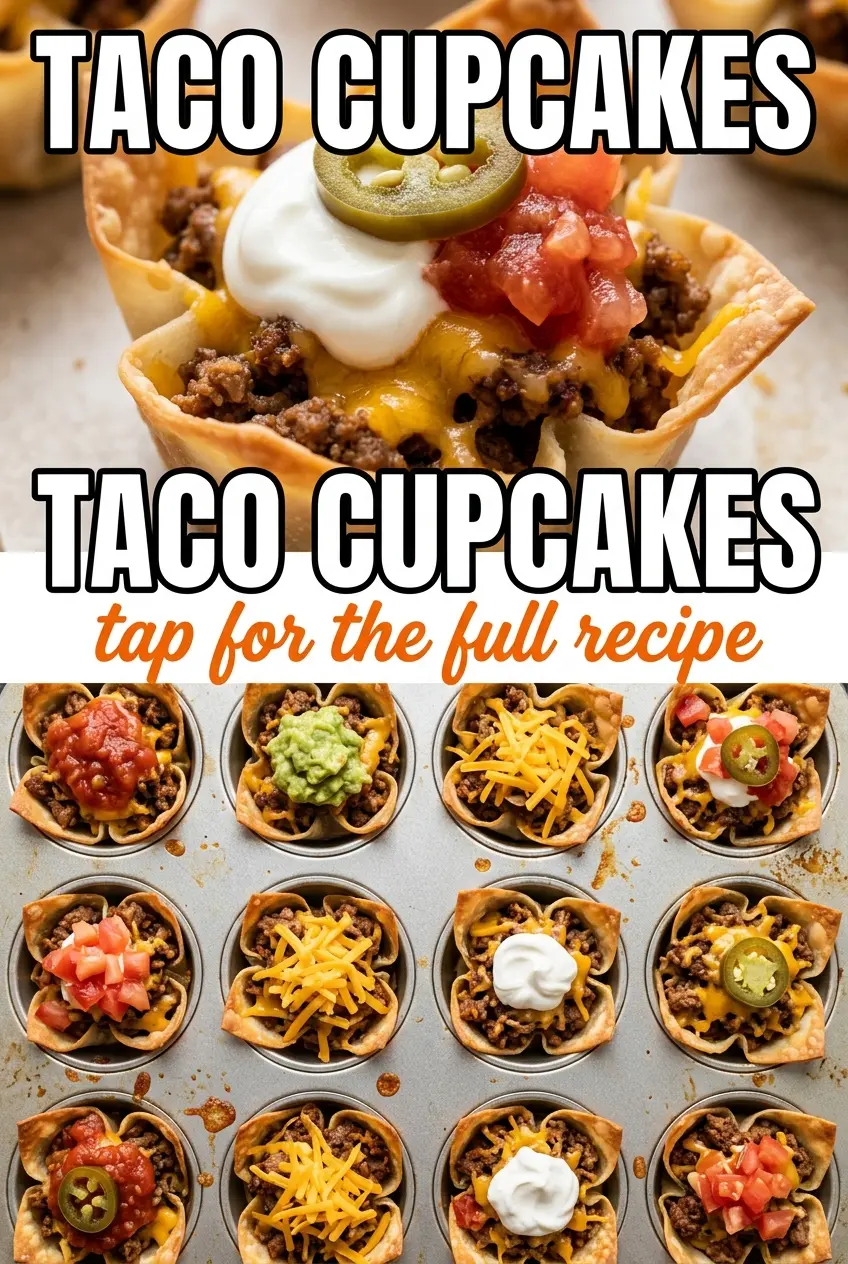
The wonton shells baked up crisp and held the filling perfectly, even after sitting out for a bit. I loved that the beef stayed juicy and the sour cream and jalapeño on top gave each bite a little cooling kick.
These taco cupcakes are the crisp little party bites that stay crunchy until the last one is gone.
The Crispy Shell Has to Come First, or Everything Turns Soft
The mistake most people make with taco cups is loading them before the shell has enough structure. A raw wrapper or tortilla piece will steam under the filling, and once the beef goes in, the bottom starts to slump. Baking the shells on their own first gives you dry heat on all sides, which is what turns them crisp and keeps them standing after filling.
The other thing that matters is where the moisture goes. Lettuce under the beef gives a little buffer, but the real protection is that baked shell and a well-drained filling. If your beef is watery, the cups go soft faster. If it looks glossy but not soupy, you’re in good shape.
- Wonton wrappers or small tortillas — Wonton wrappers bake thinner and crisp faster, which is why they give you that light, shattery bite. Small tortilla pieces make a sturdier, more familiar taco shell texture. Either works, but tortillas need a little more attention so the edges don’t burn before the center sets.
- Ground beef — Use beef with enough fat for flavor, then drain the excess after browning. Very lean beef can taste dry in this recipe unless you’re generous with seasoning and don’t overcook it after the water goes in.
- Taco seasoning and water — The water helps the seasoning cling to the meat and settle into a saucy coating instead of a dusty layer. Homemade seasoning works too if it includes cumin, chili powder, garlic, and a little salt.
- Cheddar cheese — Shredding your own gives a cleaner melt, but pre-shredded works fine here because it’s going straight on top of hot filling. The cheese acts like a glue layer that keeps the toppings anchored.
- Sour cream and fresh toppings — Add these at the end so they stay cool and bright against the hot beef. Diced tomato, onion, jalapeño, and cilantro bring enough freshness to balance the rich filling without making the cups soggy.
Building the Fillings Without Softening the Shells
Baking the Cups Until They Set
Press the wrappers or tortilla pieces down into the muffin tin so the bottom and sides touch the metal. A light coating of oil helps them brown instead of drying out pale and brittle. Bake until the edges are deeply golden and the centers look set, not floppy. If they still feel flexible when you lift one, they’ll soften fast once the filling goes in.
Seasoning the Beef the Right Way
Brown the beef over medium-high heat so it picks up a little color before the spices go in. Drain off the extra fat, then add the seasoning and water and simmer just long enough for the sauce to coat the meat. If you cook it until the pan is dry, the beef turns crumbly instead of juicy, and the filling loses some of its body.
Filling in the Order That Protects the Crunch
Start with a small layer of shredded lettuce, then add the seasoned beef, then the cheese. That order keeps the hottest filling from sitting directly against the shell and gives the cheese a chance to soften into the meat. Finish with sour cream and the fresh toppings right before serving. The longer these sit, the more the shell absorbs moisture, so this is the moment where speed matters.
Three Ways to Make Taco Cupcakes Fit the Crowd
Swap in ground turkey for a lighter filling
Ground turkey works well here if you brown it thoroughly and don’t skip the seasoning. It has less built-in richness than beef, so the taco seasoning and cheese do more of the heavy lifting. The result is a little leaner and cleaner tasting, but still plenty satisfying.
Make them gluten-free with corn tortillas
Use small corn tortillas cut into rounds or pressed into the tin in pieces. They won’t get quite as delicate and crisp as wonton wrappers, but they hold up well and bring a more classic taco flavor. Warm them briefly before shaping if they crack when you press them into the muffin cups.
Turn them into a vegetarian appetizer
Swap the beef for seasoned black beans or a mix of black beans and finely chopped sautéed mushrooms. The beans keep the filling hearty, while the mushrooms add a savory note that stands in for the meatiness you’d otherwise lose. Drain the filling well so the cups stay crisp.
Prep the components ahead, then assemble fast
Bake the shells and cook the beef a few hours in advance, then hold everything separately until just before serving. Rewarm the beef gently so it’s hot but not wet, and keep the fresh toppings cold. Assembly takes only a minute per cup, which is the easiest way to serve these when people are already in the kitchen waiting.
Storage and Reheating
- Refrigerator: Store the components separately for up to 3 days. The shells lose their crispness once assembled, so expect a softer bite if you refrigerate finished cups.
- Freezer: Freeze only the cooked beef filling if you want to work ahead. The baked shells and fresh toppings don’t freeze well, and assembled taco cupcakes turn soggy after thawing.
- Reheating: Reheat the beef in a skillet or microwave until hot, then refill freshly baked or reheated shells. If you want the shells crisp again, warm them in the oven for a few minutes before assembling, not after.
Questions I Get Asked About This Recipe
Taco Cupcakes
Ingredients
Equipment
Method
- Preheat oven to 375°F. Lightly oil a standard muffin tin so the shells release.
- Press wonton wrappers or small flour tortillas into each muffin cup to form a shell. Keep them snug against the sides to hold fillings.
- Bake shells for 8-10 minutes until golden and crispy. Remove the tin and set shells aside while you prepare the filling.
- Brown ground beef in a skillet over medium-high heat. Cook until fully browned and no pink remains.
- Drain excess fat, then add taco seasoning and water. Stir to combine.
- Simmer the beef mixture for 2-3 minutes. Cook until thickened enough to spoon cleanly.
- Fill each tortilla cup with shredded lettuce. Use enough to create a base layer.
- Add seasoned beef on top of the lettuce in each shell. Spoon in so it reaches near the top but doesn’t overflow.
- Sprinkle shredded cheddar cheese over the beef. Let the cheese sit so it begins melting in the warm shells.
- Top each cupcake with a dollop of sour cream. Place it centrally for a visible topping layer.
- Garnish with diced tomato, diced red onion, diced jalapeño, and chopped cilantro. Scatter evenly for color across the tops.
- Serve immediately while shells are crispy. Eat right away so the wonton/tortilla holds its crunch.


