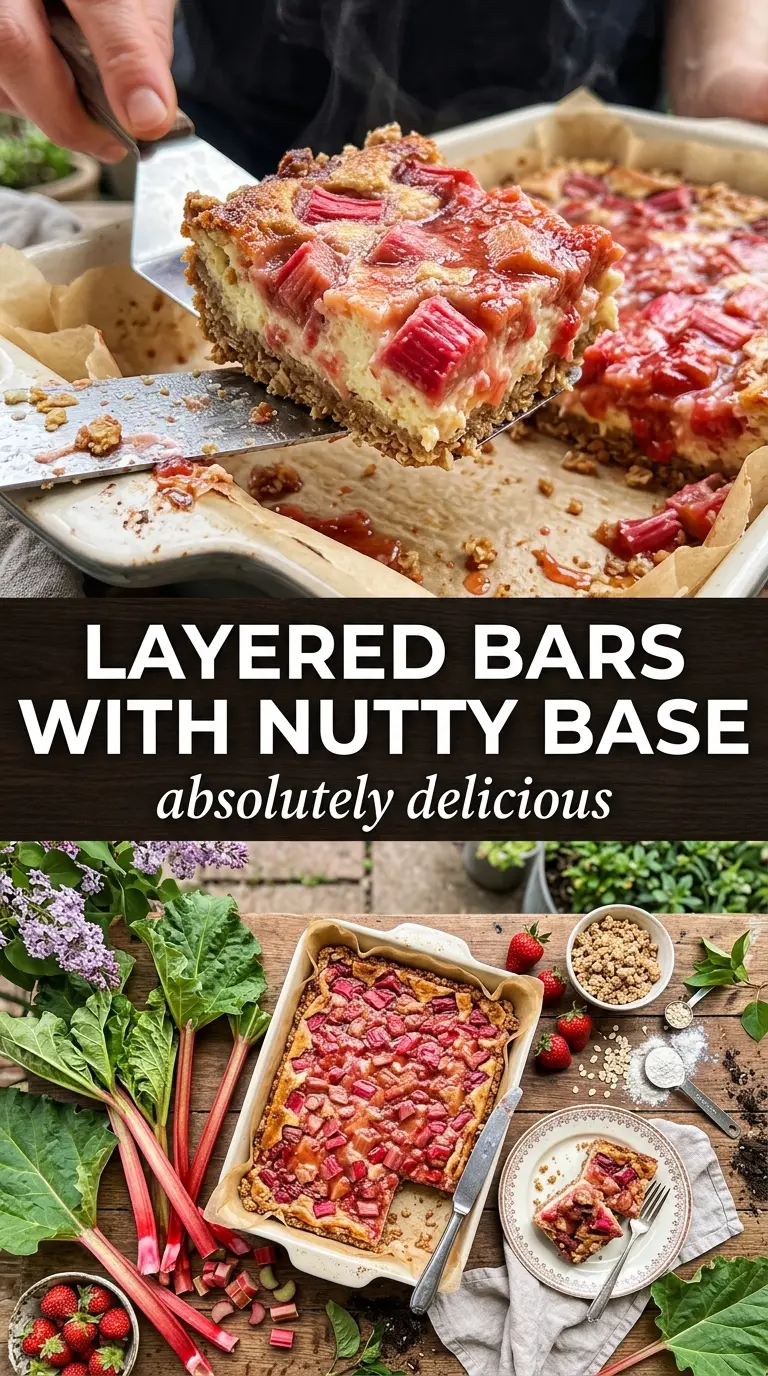
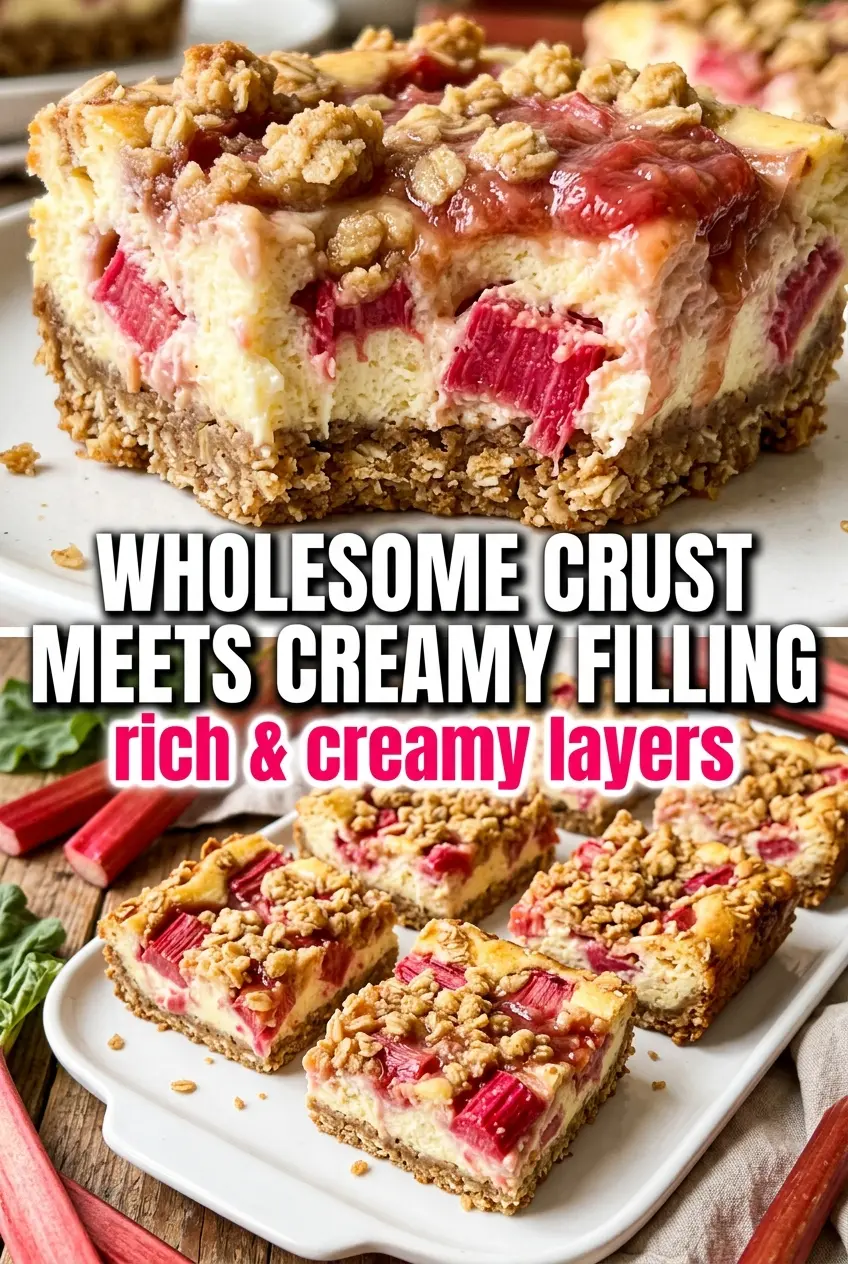
Rhubarb cheesecake bars hit that sweet spot between bright and rich, with a buttery oat crust that stays sturdy enough to hold the creamy filling and a ruby rhubarb swirl that cuts through every bite. The contrast is what makes them worth repeating: a crisp, nutty base, a smooth cheesecake layer, and just enough tart fruit to keep the bars from tasting heavy.
The crust matters here because it bakes before the filling goes in, which gives it a head start and keeps the bottom from turning soft. The rhubarb topping gets cooked first, too, so it thickens into a spoonable swirl instead of leaking watery streaks through the cheesecake. That extra minute on the stovetop is the difference between clean layers and a soggy mess.
Below, I’m walking through the parts that actually change the result: how to keep the cheesecake layer smooth, how to get a sharp swirl without overmixing it, and what to do if your rhubarb is extra tart or a little stringy.
The rhubarb stayed thick and swirled beautifully instead of sinking, and the oat crust held together when I sliced it after chilling overnight.
Save these rhubarb cheesecake bars for the layered dessert with a creamy center, tart swirl, and buttery oatmeal crust.
The Reason the Rhubarb Stays Bright Instead of Bleeding Through
The biggest mistake with layered bars like this is trying to swirl in fruit that’s still thin and hot. Once the rhubarb is cooked down with sugar and a little cornstarch, it should look glossy and thick enough to mound on a spoon. That consistency lets it sit on top of the cheesecake long enough for you to drag a knife through it without the whole layer turning pink.
The other place these bars can go wrong is the crust. A quick pre-bake sets the oats and flour so they don’t steam under the filling. If you skip that step, the bottom layer tends to bake up soft and a little greasy instead of turning into the firm, nutty base these bars need.
What the Oats, Cream Cheese, and Rhubarb Each Bring to the Pan
- Old-fashioned oats — These give the crust its hearty bite and keep it from tasting like plain shortbread. Quick oats can work in a pinch, but they lose some of that distinct texture, so the base turns softer and a little more uniform.
- Brown sugar — This adds a deeper caramel note that plays well with the tart rhubarb. White sugar will sweeten the crust, but it won’t bring the same warmth.
- Cream cheese — Use full-fat cream cheese for the smoothest filling and the best set. If the blocks are cold, the batter turns lumpy before the eggs even go in, so let them soften until they bend slightly when pressed.
- Cornstarch — This is what turns the rhubarb into a swirl instead of a sauce. Flour won’t thicken as cleanly here, and the filling can end up cloudy and pasty.
- Fresh rhubarb — Fresh stalks give the sharp, clean tartness this dessert needs. Frozen rhubarb can work, but thaw it first and drain off excess liquid so the swirl doesn’t get watery.
Building the Layers Without Losing the Swirl
Pressing and Pre-Baking the Crust
Mix the flour, oats, brown sugar, and melted butter until the mixture looks evenly damp, like coarse wet sand. Press it firmly into the parchment-lined pan, paying attention to the corners so the bars slice cleanly later. Bake until the top looks set and the edges are just starting to darken; if it still looks pale and loose, it needs a few more minutes to hold the filling.
Whipping the Cheesecake Filling Smooth
Beat the cream cheese and sugar until the mixture is completely smooth before adding the eggs. If you rush this and leave little lumps behind, they won’t disappear once the eggs go in. Add the vanilla last, then pour the filling over the warm crust in an even layer. The batter should look thick and glossy, not airy.
Cooking the Rhubarb to a Spoonable Consistency
Simmer the rhubarb with sugar and water until the pieces break down and the mixture looks jammy. Stir in the cornstarch mixture and keep cooking until it turns thick and translucent. If it still looks loose, it will sink into the cheesecake instead of sitting on top. Let it cool for a few minutes so it’s warm, not piping hot, before you drop it over the filling.
Swirling, Baking, and Chilling
Drop spoonfuls of rhubarb over the cheesecake layer, then use a knife to make slow figure-eight swirls. Don’t overdo it or the colors will blend into a pink blur. Bake until the edges are set and the center still has the slightest jiggle. Cool completely, then chill for the full four hours before cutting; if you slice them early, the layers will slump and the bars won’t hold their shape.
Three Ways to Make These Bars Work for Different Kitchens
Gluten-Free Crust Swap
Use a 1:1 gluten-free flour blend in place of the all-purpose flour and check that your oats are certified gluten-free. The texture stays close to the original, though the crust may be a touch more delicate when warm, so the chill time matters even more.
Dairy-Free Version That Still Slices Cleanly
Swap in a firm dairy-free cream cheese block, not the whipped tub style. The flavor will be a little less tangy and the filling a bit softer, so let the bars chill overnight if you can. Use a dairy-free butter substitute in the crust and keep the press-in layer compact.
Strawberry-Rhubarb Twist
Replace 1 cup of the rhubarb with chopped strawberries for a softer, sweeter swirl. The filling will lose a little of that sharp edge, but the color gets brighter and the bars taste more like a classic bakery dessert.
Storage and Reheating
- Refrigerator: Keep covered for up to 5 days. The crust softens slightly over time, but the bars stay neat and sliceable.
- Freezer: These freeze well. Cut into bars, wrap individually, and freeze for up to 2 months; thaw in the refrigerator so the cheesecake layer doesn’t weep.
- Reheating: These are best served chilled or just slightly cool, not reheated. If you want a softer bite, let a bar sit at room temperature for 10 to 15 minutes instead of warming it, which can make the filling loose.
Questions I Get Asked About This Recipe
Rhubarb Cheesecake Bars with Oatmeal Crust
Ingredients
Equipment
Method
- Preheat oven to 350°F and line a 9x13-inch pan with parchment paper. Use a sheet pan sized to fit the pan so the crust bakes evenly.
- Mix all-purpose flour, old-fashioned oats, brown sugar, and melted butter until the mixture looks like damp crumbs. Press firmly into the lined pan to form an even crust layer.
- Bake the crust for 15 minutes, until lightly golden at the edges. Let it cool while you prepare the cheesecake and rhubarb.
- Beat cream cheese and sugar until smooth and no lumps remain. Continue mixing just enough to keep the texture creamy.
- Add eggs one at a time and mix until fully combined, then add vanilla extract. Stop mixing when the batter is smooth to avoid over-aerating.
- Pour the cheesecake batter over the baked crust and spread to an even layer. Tap the pan gently to settle the surface.
- Simmer fresh rhubarb with sugar and water until tender. Cook until the rhubarb breaks down and the mixture looks syrupy.
- Mix cornstarch with water, then pour into the simmering rhubarb while stirring. Cook until thick, then remove from heat and let cool slightly so it doesn’t melt the cheesecake.
- Drop spoonfuls of the rhubarb mixture over the cheesecake and swirl with a knife. Create visible streaks and a marbled pattern across the top.
- Bake for 35-40 minutes at 350°F, until the center is set but not dry. Look for a gentle jiggle in the middle.
- Cool completely at room temperature before chilling. The top should look firm and fully set.
- Refrigerate for 4 hours before cutting. Chill until the bars slice cleanly with sharp edges.


