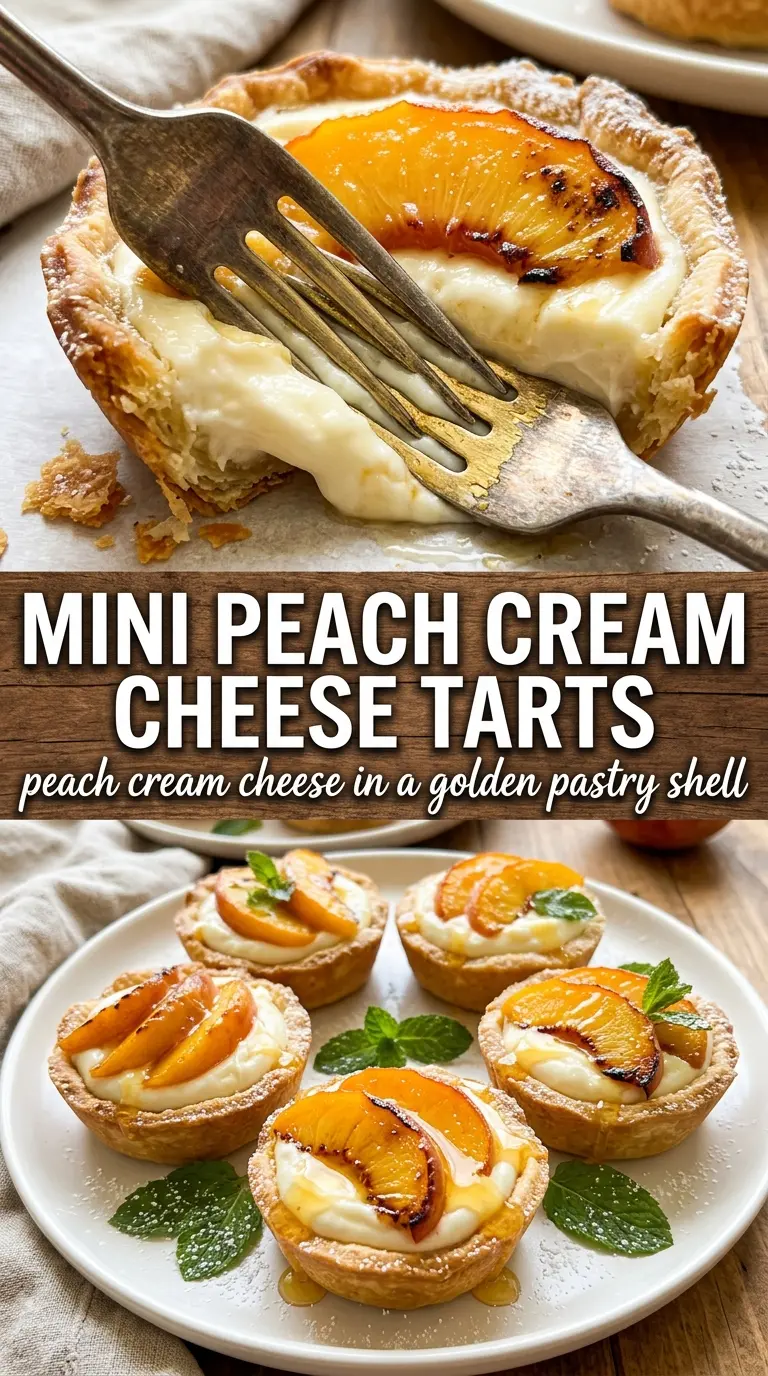
Tiny tart shells filled with whipped cream cheese and topped with fresh peaches disappear fast because they hit every note at once: crisp, creamy, juicy, and lightly glossy from the jam drizzle. The phyllo shells stay delicate but sturdy enough to hold the filling, and the peaches bring a clean sweetness that keeps each bite from feeling heavy.
What makes these work is the contrast. The cream cheese gets beaten until smooth before it ever goes into the shells, which keeps the filling from tasting dense or grainy. A little lemon zest wakes up the dairy and gives the peaches a brighter edge, while the warm jam thins just enough to brush on top without sliding off. Chill time matters here, too — it helps the topping set and gives the filling a clean, bakery-style finish.
Below, you’ll find the small details that matter most, including how to keep the shells crisp, the best way to slice the peaches, and a few easy swaps if you need to work with what you already have.
The phyllo shells stayed crisp even after chilling, and the peach-honey glaze set up just enough that they held beautifully on the platter. I used ripe peaches and the cream cheese filling was smooth instead of heavy.
Pin these mini peach cream cheese tarts for the dessert tray when you want crisp phyllo shells, silky filling, and glossy peaches in one bite.
The Trick to Keeping the Phyllo Shells Crisp Under the Filling
Mini phyllo shells can go soft if you fill them too early or if the filling is loose enough to soak into the base. The quick bake does more than warm them up; it dries out the shell just enough to give you a little cushion between the crust and the cream cheese. That matters because the filling here is soft by design, and the whole dessert depends on the contrast staying intact.
The other thing people miss is temperature. Cooled shells plus a thick, whipped filling give you a cleaner bite and a better hold. If the shells are even a little warm when the filling goes in, the cream cheese starts to loosen and the bottoms lose their snap faster than you’d expect.
- Mini phyllo tart shells — These bring the crisp texture that makes the dessert feel special. Store-bought shells are the right move here; homemade pastry would be beautiful, but not necessary for this kind of bite-size dessert.
- Cream cheese — Use full-fat cream cheese for the smoothest filling and the best structure. Low-fat versions can work, but they tend to taste thinner and soften more quickly at room temperature.
- Powdered sugar — This sweetens the filling without leaving any grittiness behind. Granulated sugar won’t dissolve as cleanly in a cold dairy base.
- Lemon zest — A small amount brightens the peaches and keeps the filling from tasting flat. If you don’t have fresh zest, a tiny splash of lemon juice works, but use less than you’d think or the filling can loosen.
- Peaches — Ripe but firm peaches slice best and hold their shape on top. If they’re very juicy, blot the slices lightly so the glaze stays on the tart instead of running off the edge.
- Peach jam or honey — This creates the glossy finish and helps the fruit look fresh longer. Jam gives a thicker sheen; honey gives a softer, more delicate glaze.
What Each Ingredient Is Actually Doing in This Recipe
- Primary ingredient (the star) — This carries the main flavor and defines the dish. Quality matters here.
- Base sauce or cooking medium (the carrier) — This brings all flavors together and keeps the dish from being dry.
- Aromatics (onion, garlic, ginger) — These add depth and complexity. They mellow and become sweet when cooked.
- Seasonings (salt, spices, herbs) — These define the personality and prevent the dish from tasting one-dimensional.
- Vegetables (nutrition and texture) — These add freshness and color. Cut to size so they cook evenly.
- Acid (lemon, vinegar, tomato, wine) — This brightens the dish and prevents it from tasting heavy or flat.
- Fat (oil, butter, cream) — This carries flavors and creates a satisfying mouthfeel. Don’t skip it.
- Proper technique (heat, time, temperature) — The right method turns good ingredients into great food. Follow the instructions carefully.
Building the Filling So It Stays Smooth and Pipeable
Warming the Shells
Bake the mini phyllo shells just until they smell toasted and the edges pick up a little color. You are not trying to brown them deeply, only to dry them out enough that they stay crisp under the filling. Let them cool all the way before you add anything, because trapped steam is the fastest way to turn a crisp tart into a soft one.
Whipping the Cream Cheese Base
Beat the softened cream cheese with the powdered sugar, vanilla, and lemon zest until the mixture looks completely smooth and a little airy. If the cream cheese is still cold, you’ll get tiny lumps that never fully disappear, so start with truly softened cream cheese, not just slightly pliable cream cheese. The filling should hold its shape when you scoop it, but still feel light enough to pipe.
Filling and Finishing
Pipe the filling into the cooled shells rather than spooning it in if you want the cleanest look. A zip-top bag with the corner snipped works just fine. Add the peach slices with a gentle press so they settle into the cream cheese, then brush or drizzle on the thinned jam while the tartlets are still open and easy to reach.
Chilling for the Final Set
The 30-minute chill does more than make them cold. It helps the glaze cling, firms the filling slightly, and lets the flavors settle together. If you serve them right away, they still taste good, but the topping won’t have that neat, polished finish.
How to Adapt These Mini Peach Cream Cheese Tarts for Different Tables
Make them a little lighter
Swap in Neufchâtel cheese for the cream cheese if you want a slightly lighter filling with a similar texture. It still pipes well and tastes close to the original, though the filling will be a touch softer and less rich.
Make them dairy-free
Use a dairy-free cream cheese that sets up firmly when chilled, not a spread that stays loose in the tub. The flavor will be a little tangier and less buttery, but the peach topping still gives you the same fresh, sunny finish.
Turn them into mixed fruit tartlets
Swap half the peaches for nectarines, raspberries, or thin strawberry slices. Softer berries will bleed into the filling a little faster, which is fine if you’re serving them the same day, but peaches and nectarines hold the cleanest look.
Storage and Reheating
- Refrigerator: Store assembled tarts in a single layer for up to 2 days. The shells will soften a bit by the second day, but the flavor stays good.
- Freezer: These don’t freeze well once assembled because the peaches turn watery and the filling can separate after thawing. You can freeze the baked shells alone, then assemble fresh.
- Reheating: These are best served cold or lightly chilled, not reheated. If the shells lose their crispness, a brief warm-up for the empty shells before filling can help, but assembled tarts should stay in the refrigerator.
Questions I Get Asked About This Recipe

Mini Peach Cream Cheese Tarts
Ingredients
Equipment
Method
- Preheat oven to 350°F and arrange mini phyllo tart shells on a sheet pan. Bake for 5 minutes until lightly crisped, then cool completely.
- In a bowl, beat cream cheese, powdered sugar, vanilla extract, and lemon zest until very smooth and fluffy. Beat until no lumps remain for a pipable texture.
- Transfer the filling to a piping bag or a zip-lock bag with a corner snipped. Pipe a generous swirl into each cooled tart shell.
- Place one or two thin peach slices onto each tart, pressing gently into the cream cheese. Arrange so the peach slice sits flat and slightly overlaps the filling.
- Whisk peach jam with warm water until pourable. Brush or drizzle the glaze over each tart so the tops look glossy.
- Refrigerate the tarts for 30 minutes to set, until the filling firms and the glaze holds. Garnish with fresh thyme sprigs before serving for a fresh green aroma.