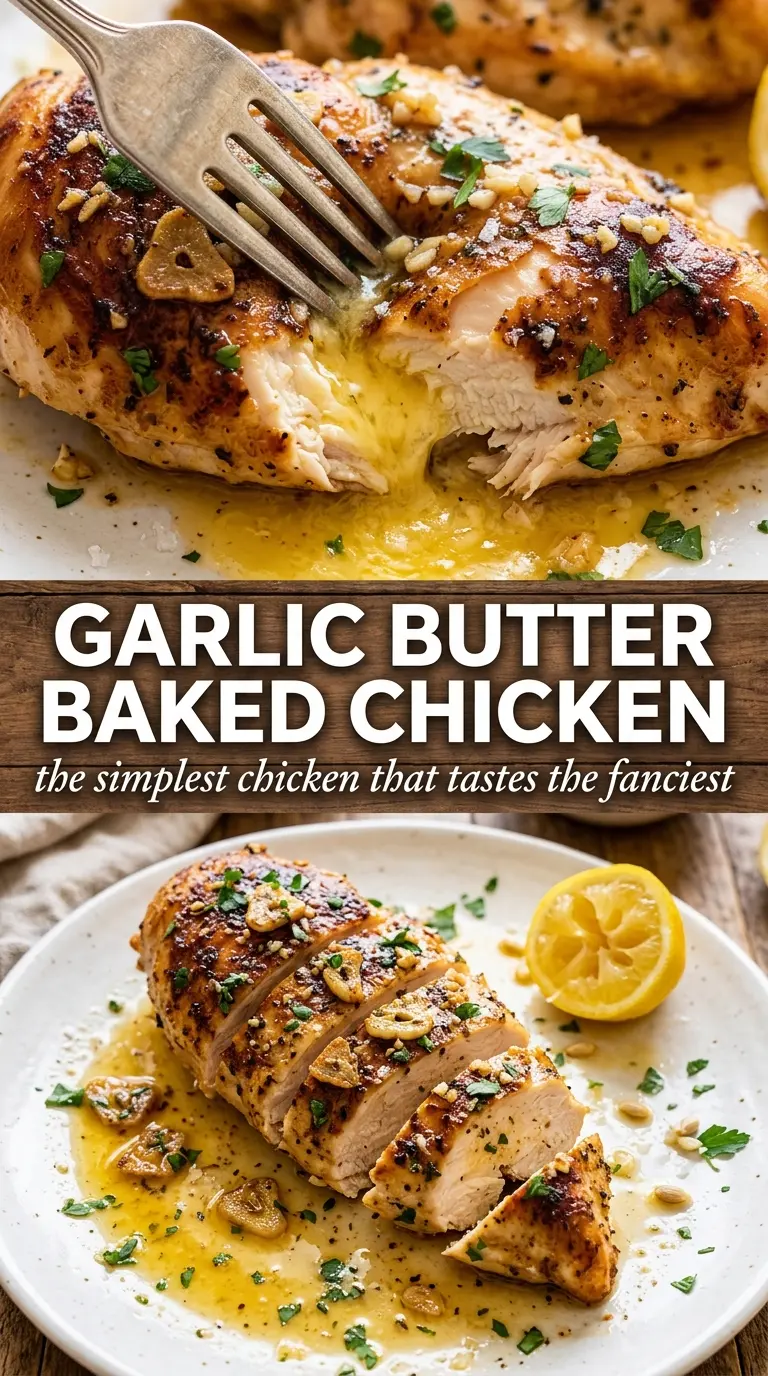
Golden, juicy chicken breasts with a garlic herb butter glaze have a way of making a plain weeknight dinner feel like you actually planned ahead. The butter pools in the baking dish, the garlic turns fragrant instead of harsh, and the chicken stays tender because it’s baked hot and finished with its own pan juices spooned back over the top.
What makes this version work is the balance: enough butter to baste the chicken and keep the surface from drying out, but not so much that it turns greasy. The lemon juice sharpens the richness, while parsley, thyme, and rosemary keep the flavor from tasting flat. Baking at a higher temperature helps the breasts cook through before they have time to toughen, which is where a lot of baked chicken goes wrong.
Below, I’m walking through the part that matters most: how to get the chicken cooked through without drying it out, how to keep the garlic from burning, and what to change if your chicken breasts are especially large or uneven.
The butter sauce stayed in the pan instead of burning, and the chicken was still juicy after 25 minutes. I spooned the juices over rice and my husband asked if I could put this in the rotation every week.
Save this garlic butter baked chicken breast for the nights when you want juicy chicken and a built-in pan sauce without extra dishes.
The Reason Baked Chicken Turns Dry Before It Ever Browns
Chicken breast dries out when it spends too long in the oven before the surface has a chance to pick up color. That’s why a hotter bake works here. The garlic butter coats the outside, helps the seasoning cling, and gives the chicken a little protection while the oven finishes the inside.
The other mistake is using chicken breasts that are wildly different in thickness. One thin end cooks through fast while the thick side still needs time, and that’s how you end up with stringy edges. If yours are uneven, lightly pound the thicker end so each breast cooks at the same pace. It’s a small step that changes the whole dish.
- Chicken breasts — Boneless, skinless breasts are the right cut here because they cook quickly and absorb the butter baste well. If one breast is much larger than the others, split it horizontally or pound it slightly so the batch finishes together.
- Butter — Melted butter carries the garlic and herbs over the chicken and into the pan juices. Margarine won’t give you the same richness or the same sauce at the end.
- Fresh garlic — Fresh minced garlic gives the best flavor, but it needs the butter to keep it from scorching. Garlic powder alone won’t taste the same, though a little extra can help if your cloves are small.
- Lemon juice — This cuts through the butter and keeps the sauce from tasting heavy. Bottled lemon juice works in a pinch, but fresh gives the cleanest finish.
- Fresh herbs — Parsley, thyme, and rosemary make the pan juices taste layered instead of one-note. Dried herbs can stand in, but use less because they’re stronger and can get woody if you overdo them.
What Each Ingredient Is Actually Doing in This Chicken
- Chicken breasts (the protein) — Let them sit at room temperature 15 minutes before cooking. This helps them cook evenly without drying.
- Oil or butter (the cooking medium) — This prevents the chicken from drying out and carries herb and spice flavors throughout.
- Garlic (the aromatic foundation) — Fresh minced garlic mellows and becomes sweet when cooked. Don’t brown it or it turns bitter.
- Cream or sauce (the moisture keeper) — This prevents the chicken from drying out during cooking. Balance richness with acid.
- Lemon, wine, or acid (the brightness) — This prevents heavy cream sauces from tasting flat. Add at the end to preserve freshness.
- Fresh herbs (basil, thyme, parsley) — Add some during cooking and some after so you get both cooked and fresh flavors.
- Cheese or toppings (optional richness) — These add creaminess and depth. Don’t overdo it or the dish becomes heavy.
- Proper oven temperature (375-400°F) or pan heat — This cooks chicken through without drying the edges. Use a thermometer for 165°F.
Basting, Temperature, and the Last Five Minutes That Matter
Seasoning the Chicken First
Pat the chicken dry, then season both sides with salt, pepper, garlic powder, and smoked paprika. Dry chicken browns better, and the seasoning sticks instead of sliding off into the dish. If the breasts are wet when they go in, the butter can’t cling properly and the surface stays pale. Let the seasoning sit while the oven heats so it starts working into the meat.
Building the Garlic Herb Butter
Stir the melted butter with the garlic, parsley, thyme, rosemary, and lemon juice until it looks evenly speckled. You want the garlic distributed, not dumped in one spot, because that’s what keeps it from burning into bitter little patches. The mixture should smell buttery and sharp, not cooked yet. If your butter starts to separate, just stir again right before pouring.
Baking Until Just Done
Pour the butter over the chicken so every breast is coated, then bake at 425°F for 20 to 25 minutes. Halfway through, spoon the pan juices over the tops to keep the surface glossy and help the herbs stay in place. The safest test is the thickest part of the breast reaching 165°F, but don’t wait much past that or the texture starts turning chalky. Pull the dish as soon as the center is done and the juices are bubbling around the edges.
Resting and Serving
Let the chicken rest for 5 minutes before cutting into it. That short pause keeps the juices inside the meat instead of spilling onto the cutting board. Spoon the pan juices over the top and add lemon wedges at the table. The extra squeeze wakes up the butter sauce and keeps each bite from feeling heavy.
What to Change When You Need a Different Version
Dairy-Free Garlic Herb Chicken
Use a good dairy-free butter substitute that melts cleanly, not a tub spread that stays waxy. You’ll still get the garlic-herb coating and pan juices, but the sauce will taste a little less round than the butter version. A pinch of olive oil can help the mixture cling if your substitute is thin.
Boneless Thighs Instead of Breasts
Chicken thighs are more forgiving and stay juicy even if you go a few minutes over. They usually need a little longer in the oven, and the skinless version won’t brown the same way, but the butter sauce clings beautifully to the richer meat.
Gluten-Free and Naturally Low-Carb
This recipe is already gluten-free and low in carbs as written, so there’s nothing tricky to swap. Serve it with roasted vegetables, mashed cauliflower, or rice depending on what you need on the table.
Make It a Little Brighter
Add extra lemon juice or a few thin lemon slices to the baking dish if you want a sharper finish. More acid cuts the richness, but too much can flatten the butter flavor, so add it in small amounts and taste the pan juices after baking.
Storage and Reheating
- Refrigerator: Store leftovers in an airtight container for up to 4 days. The butter sauce firms up in the fridge, but it loosens again when reheated.
- Freezer: It freezes fine for up to 2 months, though the texture is best when frozen in slices with some pan juices. Thaw overnight in the refrigerator before reheating.
- Reheating: Warm gently in a covered baking dish at 300°F with a splash of the pan juices or broth. High heat dries out chicken breast fast, so skip the microwave if you can.
Questions I Get Asked About This Recipe

Garlic Butter Baked Chicken Breast
Ingredients
Equipment
Method
- Preheat the oven to 425°F and lightly grease a baking dish, ensuring the surface is ready for direct contact and even baking.
- Season the chicken breasts on both sides with salt, pepper, garlic powder, and smoked paprika so each breast is evenly coated.
- Melt the butter and stir in the minced garlic, parsley, thyme leaves, minced rosemary, and fresh lemon juice until combined and fragrant.
- Place the chicken in the prepared dish and pour the garlic herb butter over each breast, coating thoroughly, then let the butter pool around the base.
- Bake for 20-25 minutes at 425°F, basting with the pan juices once at the halfway point until the surface turns golden and the glaze looks glistening.
- Bake until the internal temperature reaches 165°F when checked at the thickest part, with juices running clear.
- Rest the chicken for 5 minutes so the juices redistribute and the glaze clings to the surface.
- Serve with the pan juices spooned over the chicken and lemon wedges alongside for bright finishing.