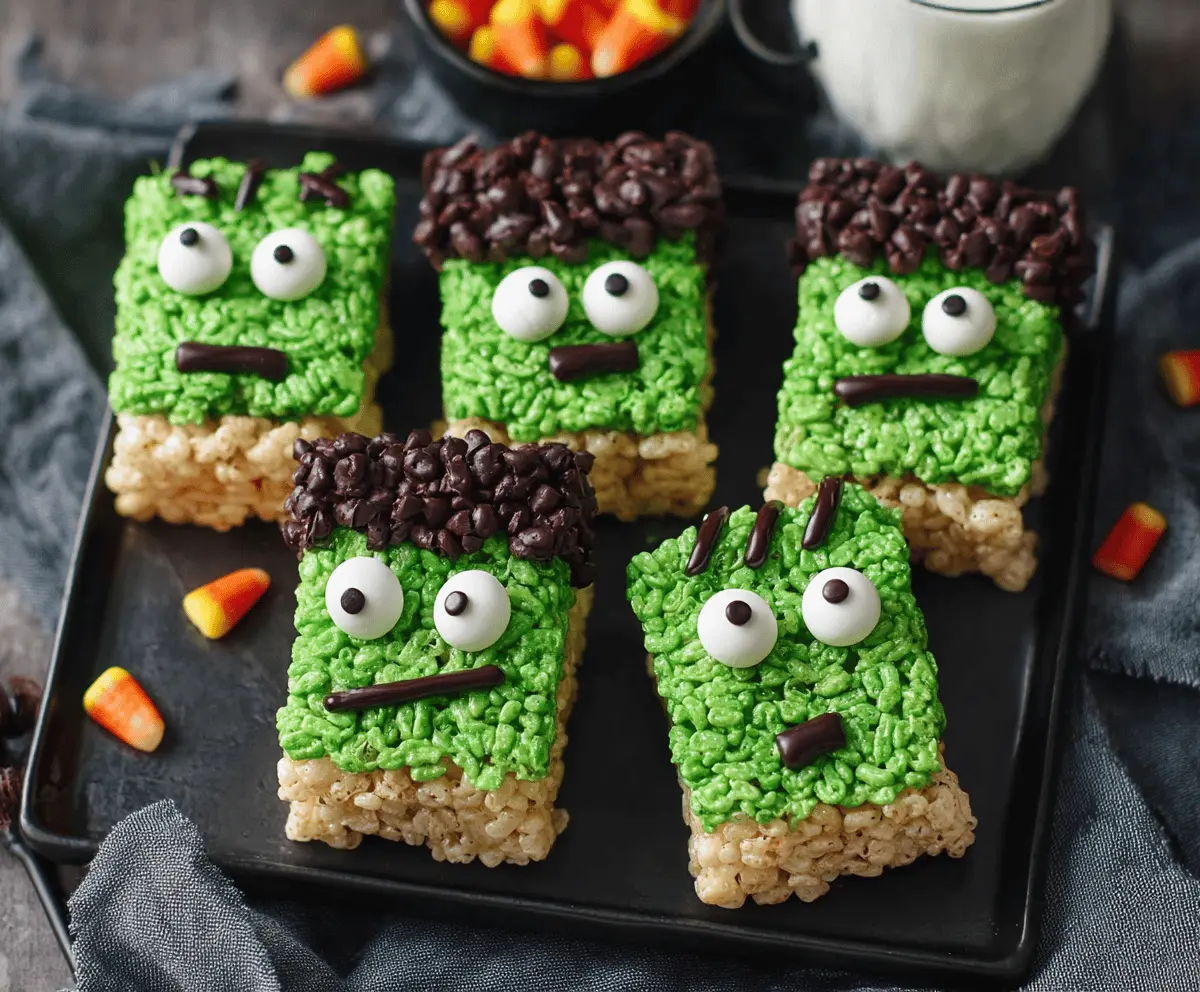
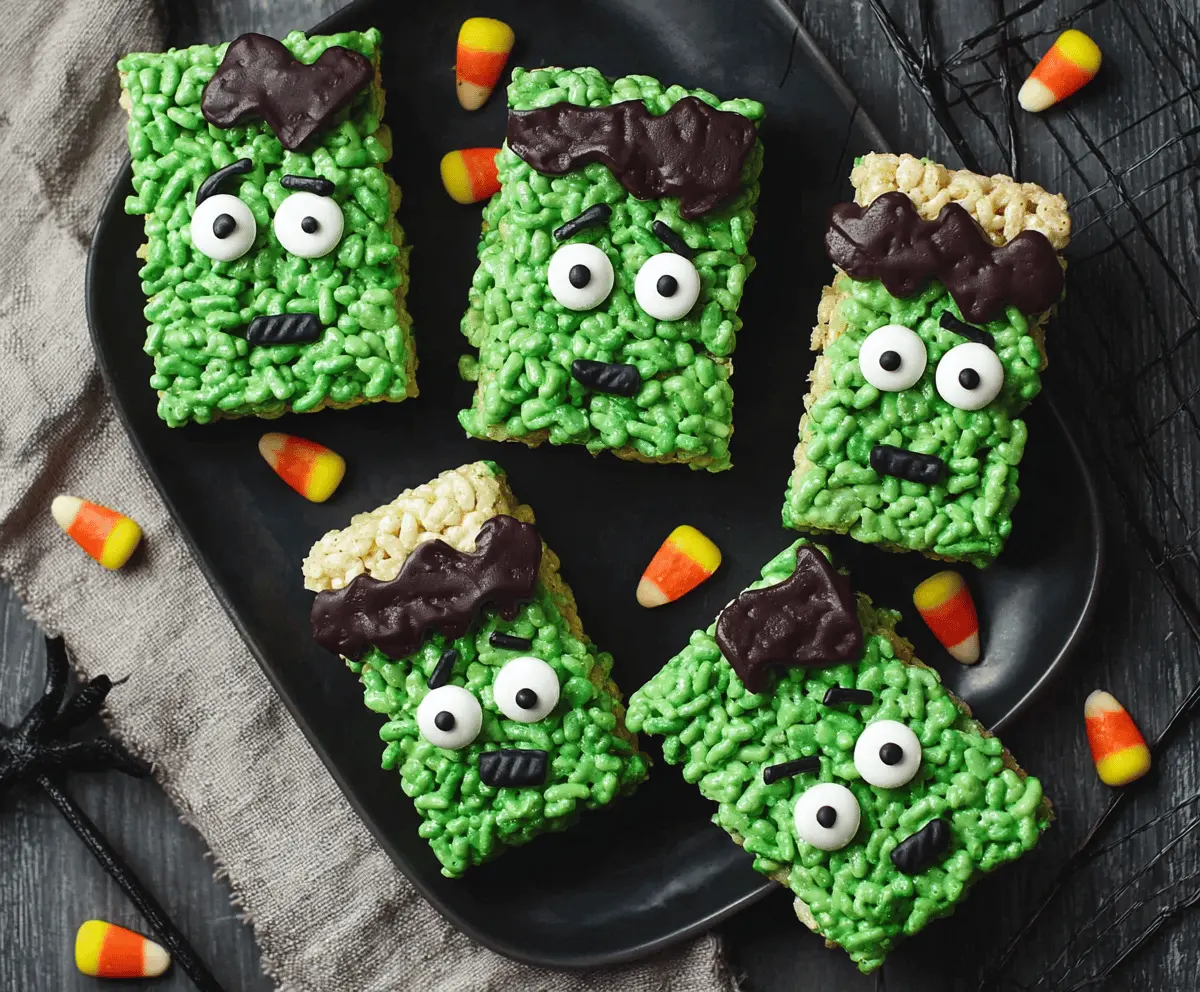
Bring a little spooky fun to your Halloween table with Frankenstein Rice Krispie Treats—soft, chewy cereal bars dressed up like mini green monsters with chocolate “hair,” candy eyes, and pretzel bolt “ears.” They’re festive without being fussy, perfect for classroom parties, bake sales, or a quick activity to make with kids on a cool October afternoon. The base stays classic and buttery, while the decorative touches turn an everyday favorite into a delightfully ghoulish dessert.
What makes these so lovable is the balance of ease and wow-factor. The treats press into the pan in minutes, set quickly, and decorate even faster. A hint of vanilla and plenty of marshmallow keep the texture irresistibly soft; a few drops of food coloring bring that unmistakable Frankenstein green. You can finish the faces with chocolate, icing, or melted candy—whatever you’ve got in the pantry—so they’re as practical as they are playful.
Serve them on a platter with other Halloween bites, tuck them into lunchboxes, or wrap individually with ribbon for party favors. They hold well at room temperature and are sturdy enough to travel, so you can bake the night before and still get picture-perfect monsters by showtime.
Key Ingredients & Substitutions
A few pantry staples plus simple decorations are all you need. Here’s how to adapt based on your time and what’s already in your kitchen.
Rice cereal: Crisped rice cereal is classic and gives the signature airy crunch. Any plain puffed rice cereal works; avoid flavored varieties that can overpower the vanilla-marshmallow base.
Mini marshmallows: They melt evenly for a smooth, stretchy mixture. Large marshmallows work in a pinch (use weight, not cup measure). For extra-gooey treats, add an extra cup.
Unsalted butter: Adds rich flavor and soft bite. Salted butter works—reduce or omit added salt. For dairy-free, use a plant-based buttery stick.
Vanilla extract & pinch of salt: Round out sweetness and boost flavor. Skip salt if using salted butter.
Green gel or liquid food coloring: A few drops create the Frankenstein hue. Mix blue + yellow if you’re out of green, adjusting for a bright-but-not-neon tone.
Candy melts or chocolate chips (for hair): Melted dark or milk chocolate gives shiny, delicious “hair.” Black or dark brown candy melts set faster and are easy to pipe.
Candy eyes: Instant personality. If you can’t find them, pipe dots of white and dark icing, or use mini white chocolate chips with a tiny chocolate dot.
Black writing gel or icing: For stitches and mouths. Chocolate or dark-colored frosting in a small piping bag also works.
Mini pretzel sticks: Snap into short lengths for neck “bolts.” For nutty flavor or gluten-free needs, try halved shelled sunflower seeds or small gluten-free pretzels.
Equipment You’ll Need
- 9×13-inch baking pan (metal preferred)
- Large pot or Dutch oven
- Rubber spatula (lightly greased)
- Measuring cups and spoons
- Parchment paper (for a sling)
- Microwave-safe bowl (for melting chocolate/candy melts)
- Piping bag or zip-top bag with a tiny snipped corner
Flavor Variations & Add-Ins
- Chocolate-mint monsters: Add 1/2 teaspoon peppermint extract to the marshmallow mixture and use dark chocolate for hair.
- Cookies & cream crunch: Fold 1 cup crushed chocolate sandwich cookies into the cereal before pressing into the pan.
- Peanut butter twist: Stir 1/3 cup creamy peanut butter into the melted marshmallow mixture (reduce butter to 3 tablespoons).
- Salted caramel: Drizzle cooled bars with caramel and sprinkle with flaky salt before decorating faces.
- Monster confetti: Mix 1/3 cup Halloween sprinkles into the base or scatter over the “hair” while it’s still tacky.
- Dairy-free: Use vegan marshmallows and plant-based butter; decorate with dairy-free chocolate.
- Gluten-free: Ensure cereal, pretzels, and decorations are certified GF.
How to Make Frankenstein Rice Krispie Treats
Ingredients You’ll Need:
- 6 cups crisped rice cereal
- 10 ounces mini marshmallows (about 6 cups), plus 1 cup extra for extra-gooey texture (optional)
- 4 tablespoons unsalted butter
- 1 teaspoon vanilla extract
- Pinch of fine salt
- Green gel or liquid food coloring
- 1 cup dark or milk chocolate chips or black candy melts (for hair)
- 24–30 candy eyes
- 12–15 mini pretzel sticks, broken into “bolts”
- Black writing gel or chocolate icing (for mouths and stitches)
How Much Time Will You Need?
Plan for 10 minutes of stovetop prep, 20–30 minutes to cool and set, and 10–15 minutes to decorate. Total time: about 45–55 minutes.
Step-by-Step Instructions:
1. Prepare the pan
Line a 9×13-inch pan with parchment, leaving overhang on the long sides for easy lifting. Lightly grease the parchment. Measure the cereal into a large bowl so it’s ready to go.
2. Melt and color the marshmallow mixture
In a large pot over medium-low heat, melt the butter. Add the marshmallows and stir constantly until smooth and fully melted. Remove from heat and stir in vanilla, salt, and 2–4 drops of green food coloring. Adjust to your desired Frankenstein shade. If using an extra cup of marshmallows for extra-gooey texture, fold them in now just until partially melted for soft pockets.
3. Combine with cereal and press
Immediately add the cereal and mix with a greased spatula until evenly coated. Scrape into the prepared pan and press gently into an even layer—do not compact too hard or the bars will be dense. Let cool at room temperature until set, 20–30 minutes.
4. Portion and add hair
Lift the slab onto a cutting board and cut into rectangles (about 12–15 bars). Melt chocolate or candy melts in a microwave-safe bowl in 20–30 second bursts, stirring between each, until smooth. Dip or spoon the top 1/3 of each bar to create Frankenstein’s “hair.” Set on parchment to firm slightly.
5. Add eyes, bolts, and features
Press two candy eyes into each bar just under the hairline while the chocolate is tacky, or use a small dot of chocolate/icing as glue if it has already set. Poke a short pretzel piece into each side near the bottom for “bolts.” Pipe a stitched smile or zigzag mouth with black gel or icing. Let decorations set before serving.
Pro Tips for Best Texture & Taste
A few small moves ensure perfectly soft bars with clean edges and decorations that stay put.
- Low heat is key: Melt marshmallows gently over medium-low; high heat can toughen the final texture.
- Grease the tools: Lightly coat the spatula (and your hands) with butter or neutral oil to prevent sticking and avoid overcompressing.
- Cut, then decorate: Slice bars before adding hair and faces for cleaner edges and less mess.
- Work in batches: Decorate a few bars at a time so the chocolate stays tacky for eyes and sprinkles.
- Room-temp set: Let the bars set at room temperature; refrigeration can make them too firm and sticky once they warm back up.
Frequently Asked Questions
Can I make these ahead?
Yes. Make up to 24 hours in advance and store in an airtight container at cool room temperature. If your kitchen is very warm, layer parchment between bars to prevent sticking.
How do I store leftovers?
Keep in an airtight container at room temperature for 2–3 days. For longer storage, wrap bars individually and freeze up to 1 month; thaw at room temperature before serving.
Can I use store-bought frosting instead of melted chocolate for the hair?
Absolutely. Pipe or spread a thick layer of dark frosting for hair. It won’t set as firm as chocolate but is quick and kid-friendly.
How can I make these without food coloring?
Skip the coloring and call them “mummy” or “monster” treats, or tint naturally with a small amount of matcha powder (mild tea flavor) or spinach powder for a subtle green hue.