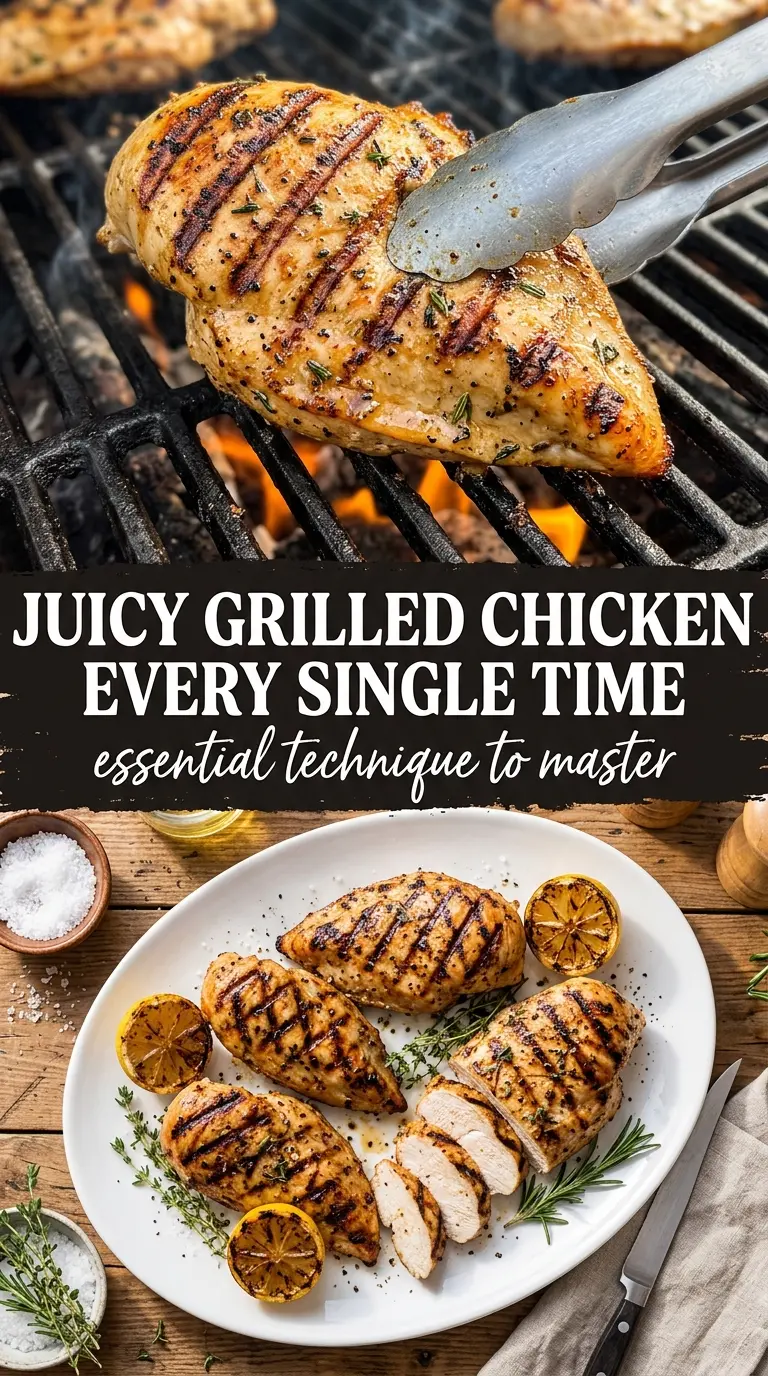
Grilled chicken breast earns a permanent spot in the rotation when it comes off the grates with deep char marks on the outside and a juicy, tender center instead of the usual dry, stringy disappointment. The difference is all in the brine and the restraint: a short saltwater soak seasons the meat all the way through, and a hot grill does the rest without squeezing out every drop of moisture.
This version keeps the seasoning simple on purpose. Garlic powder, paprika, black pepper, and onion powder give the chicken a savory crust without burning before the inside is cooked. Drying the chicken well after the brine matters just as much as the brine itself, because wet chicken steams on the grill instead of searing.
Below, I walk through the small details that keep chicken breast juicy, from the exact brine timing to the moment to pull it off the heat. If you’ve had grilled chicken turn bland or chalky before, the fixes here are straightforward and worth using every time.
The brine made all the difference. The chicken stayed juicy all the way through, and the grill marks came out perfect without the seasoning burning.
Save this grilled chicken breast for the nights when you want juicy, well-seasoned chicken with actual grill marks, not a dry dinner rescue mission.
The Brine Is What Keeps This Chicken From Turning Stringy
Most grilled chicken breast goes wrong before it ever hits the grill. The meat is either underseasoned in the center or overcooked on the outside by the time the middle is safe. A short brine fixes the first problem by seasoning the chicken all the way through and helping the muscle fibers hold onto moisture while they cook.
The key is timing. Thirty minutes is enough for boneless breasts without making them taste cured or overly salty. Longer isn’t automatically better here, especially with smaller chicken breasts, because an extended brine can push the texture in the wrong direction and make the exterior too salty before the inside catches up.
What the Seasoning Blend Is Doing Besides Adding Flavor
- Chicken breasts — Try to use pieces that are close to the same thickness so they cook at the same rate. If one end is much thicker, give it a gentle pound to even it out before brining. That keeps the thin edge from drying out while the thick part finishes.
- Salt and sugar — The salt seasons and helps the meat retain moisture; the sugar softens the edges of the grill crust and balances the savory seasoning. Don’t skip the sugar unless you have to. It’s a small amount, and it helps the exterior brown without tasting sweet.
- Olive oil — This gives the spices something to cling to and helps the surface sear instead of sticking. A neutral oil works too, but olive oil adds a little extra flavor and is fine for this level of heat.
- Garlic powder, paprika, black pepper, and onion powder — This blend gives you a dry rub with enough depth to stand up to the grill. Paprika helps with color, garlic and onion bring savoriness, and black pepper keeps the finish from tasting flat. Fresh garlic is a poor swap here because it can burn before the chicken is done.
Getting the Grill Marks Without Drying Out the Meat
Brine and Dry the Chicken Properly
Dissolve the salt and sugar completely in the water before adding the chicken so the brine hits evenly from the start. After 30 minutes, pull the chicken out and pat it dry on every side. If the surface stays wet, the seasoning slides off and the chicken steams instead of searing.
Season for the Grill, Not for the Bowl
Brush the chicken with olive oil, then coat it generously with the spice mix. The oil helps the seasoning stick and protects the surface during cooking. Press the spices on lightly with your hands so they don’t fall off the second the chicken hits the grates.
Cook Over Medium-High Heat and Leave It Alone
Preheat the grill until it’s hot enough to sizzle immediately, then oil the grates so the chicken releases cleanly. Grill for 6 to 7 minutes per side without moving the pieces around. If you keep flipping or nudging them, the crust tears before it can set, and you lose those clean grill marks.
Pull at 165°F and Rest Before Slicing
Use an instant-read thermometer and take the chicken off as soon as the thickest part reaches 165°F. Let it rest for 5 minutes before cutting into it. If you slice too soon, the juices run out onto the cutting board instead of staying in the meat where they belong.
Three Ways to Work This Recipe Into Real-Life Dinners
Dairy-Free and Gluten-Free as Written
This recipe already fits both needs without any changes. The brine, oil, and spice rub do the work, so you don’t need breadcrumbs, butter, or a sauce to get good flavor. That makes it an easy main dish to pair with almost anything.
Use Chicken Thighs for a Forgiving Swap
Boneless thighs work well if you want a richer, juicier result and don’t mind a slightly longer cook time. They’ll usually need a few extra minutes per side, and they’re harder to overcook than breasts. The seasoning stays the same, but the texture gets more tender and less lean.
Turn It Into a Meal Prep Protein
Grill the chicken, let it cool, then slice it for salads, grain bowls, wraps, or pasta. The brine helps it stay tender even after chilling, which is the part most meal prep chicken misses. Keep the slices rather than cubing it; thinner pieces reheat more evenly and stay juicier.
Storage and Reheating
- Refrigerator: Store leftovers in an airtight container for up to 4 days. Slice only what you need so the remaining chicken stays juicier.
- Freezer: Freeze sliced or whole cooked chicken for up to 2 months. Wrap tightly and thaw in the refrigerator so it doesn’t turn wet and grainy from a fast thaw.
- Reheating: Reheat gently in a covered skillet with a splash of water or broth over low heat, or use the microwave at short intervals. High heat dries grilled chicken out fast, so warm it just until it’s heated through.
Answers to the Questions Worth Asking

Perfect Grilled Chicken Breast
Ingredients
Equipment
Method
- In a large container, dissolve the salt and sugar in the water to make a brine, then submerge the chicken and refrigerate for 30 minutes.
- After 30 minutes, remove the chicken from the brine and pat completely dry with paper towels, then brush both sides with olive oil.
- In a small bowl, mix the garlic powder, paprika, black pepper, and onion powder, then season the chicken generously on both sides.
- Preheat the grill to medium-high heat (about 400°F), then oil the grates so the chicken releases cleanly.
- Place chicken on the grill and cook for 6-7 minutes per side without moving, until the internal temperature reaches 165°F.
- Remove chicken from the grill and let it rest for 5 minutes, so juices redistribute before slicing.
- Slice the breasts and serve, fanning the pieces to show the juicy interior and grill marks, with any fresh herbs if desired.


