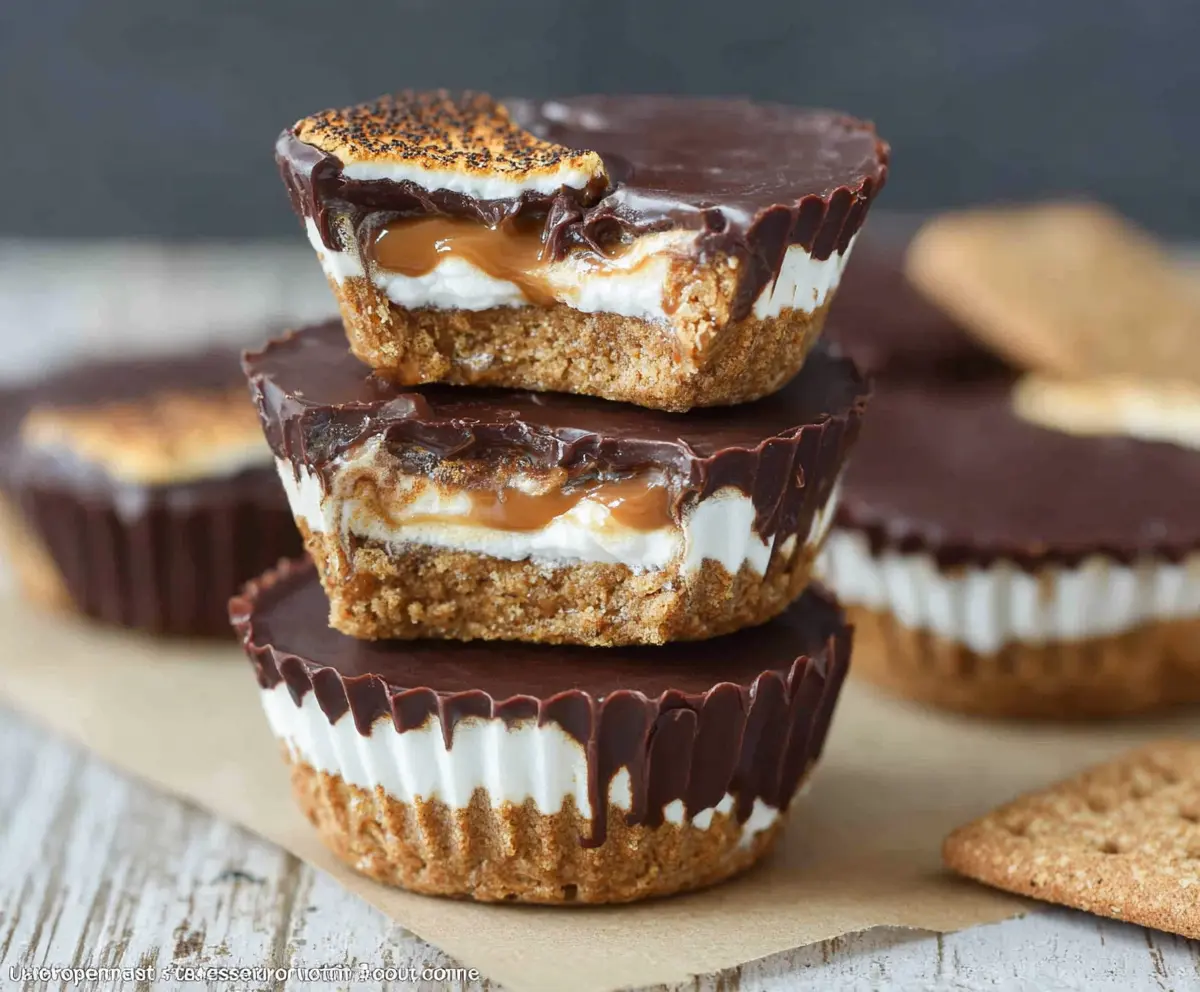
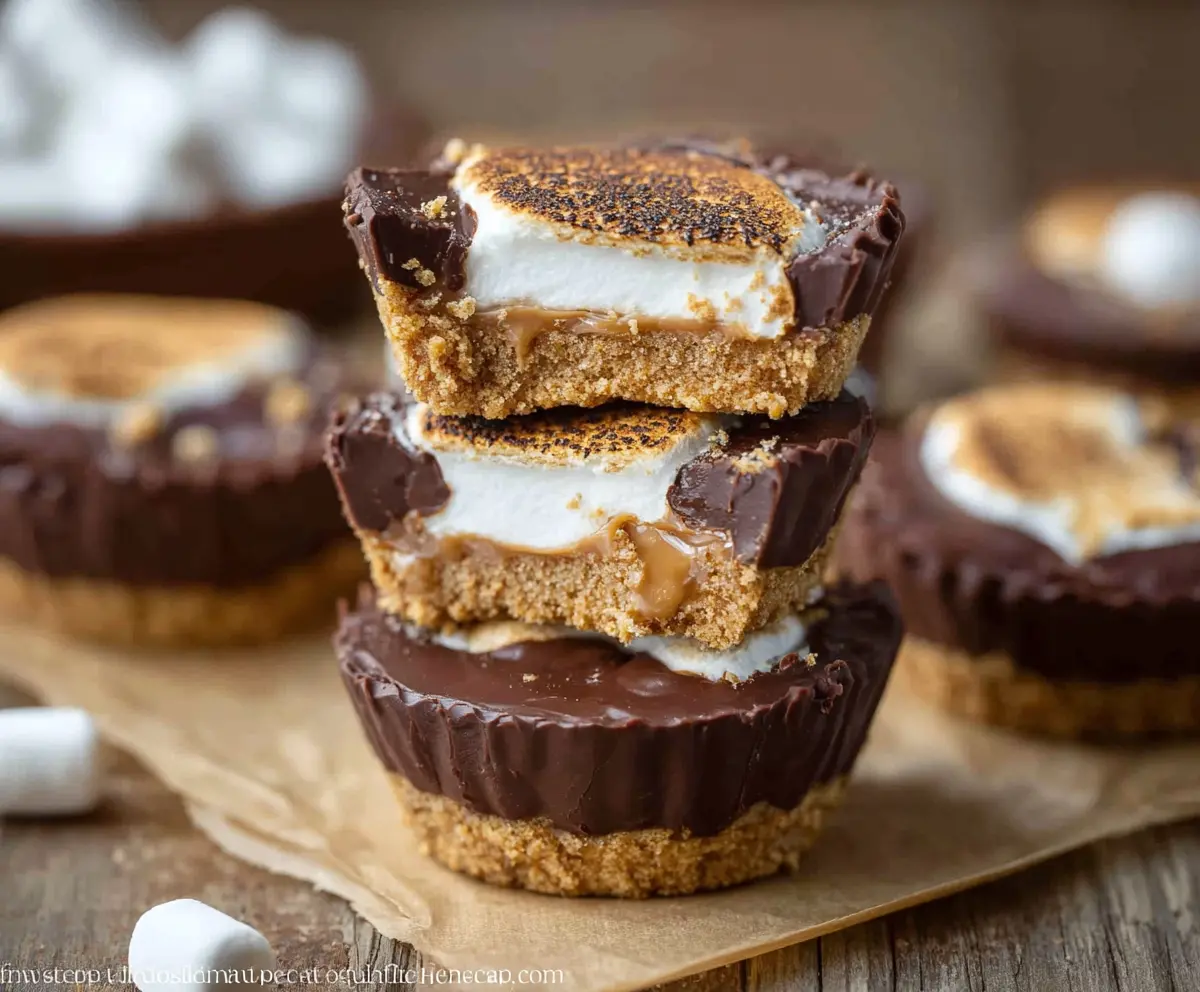
These S’mores Peanut Butter Cups are a fun twist on the classic treat! Filled with creamy peanut butter, sweet chocolate, and crunchy graham crackers, they are simply delightful!
Whenever I make these, I can’t help but sneak a few before they’re even set. Who can blame me? Having a little extra chocolate never hurt anyone! 😄
Key Ingredients & Substitutions
Graham cracker crumbs: The base for our cups, graham cracker crumbs provide that classic s’mores flavor. If you can’t find them, you can blend digestive biscuits or vanilla wafer cookies as a tasty alternative!
Creamy peanut butter: I like using standard creamy peanut butter for this recipe because it spreads easily. If you prefer a different flavor, almond or cashew butter can work, just keep in mind they will change the taste a bit.
Mini marshmallows or marshmallow fluff: Marshmallows add great texture. If you’re vegan, use vegan marshmallows or make a homemade equivalent with aquafaba. Fluff works great if you’re short on time!
Coconut oil: I suggest using coconut oil to thin the chocolate. Not only does it work well, but it also gives a subtle hint of coconut flavor! You can substitute with vegetable oil, but it won’t add that unique touch.
How Do You Get Perfectly Layered Cups?
The trick to achieving those tasty layers is patience! Start by pressing the graham cracker mixture into the muffin cups firmly, creating a solid base. Let each layer chill briefly before adding the next layer to keep them from mixing together.
- For the peanut butter layer, warm it slightly to make spreading easier. This keeps it smooth.
- When adding marshmallows, ensure they’re as even as possible, so every bite is filled with that fluffy goodness.
- For the chocolate layer, pouring it on top helps preserve your layers, but remember to tap the tray to remove air bubbles and create a smooth top!
How to Make S’mores Peanut Butter Cups
Ingredients You’ll Need:
For The Crust:
- 1 1/2 cups graham cracker crumbs (about 10 full sheets)
- 1/4 cup granulated sugar
- 6 tbsp unsalted butter, melted
For The Fillings:
- 1 cup creamy peanut butter (divided)
- 1 1/2 cups mini marshmallows or marshmallow fluff
- 1/2 cup caramel sauce (store-bought or homemade)
For The Topping:
- 2 cups semi-sweet chocolate chips
- 2 tbsp coconut oil or vegetable oil (to thin chocolate)
- Optional: extra graham cracker crumbs for garnish
How Much Time Will You Need?
This recipe should take about 30 minutes of active preparation time, plus an additional hour for chilling in the fridge. Just follow the steps to layer everything up, and then let it set. Easy peasy!
Step-by-Step Instructions:
1. Prepare the Crust:
In a medium bowl, mix together the graham cracker crumbs, sugar, and melted butter. Stir until it looks like damp sand. This will be your crunchy base!
2. Form the Base:
Line a 12-cup muffin tin with cupcake liners. Take about 1 to 1 1/2 tablespoons of the graham cracker mixture and press it firmly into the bottom of each liner. Once all cups are pressed down, pop the tin into the fridge for about 10 minutes to set.
3. Peanut Butter Layer:
Warm 3/4 cup peanut butter in the microwave for about 20 seconds to make it easier to spread. Spoon about 1 teaspoon of the warm peanut butter onto each crust and gently spread it evenly. Return the tin to the fridge for another 10 minutes.
4. Add Marshmallows:
Now, place a layer of mini marshmallows or about 1 tablespoon of marshmallow fluff on top of the peanut butter layer. You want each cup to have a nice fluffy layer!
5. Caramel Layer:
Spoon about 1 teaspoon of caramel sauce over the marshmallows in each cup. Be careful not to fill them too much so they don’t overflow.
6. Melt Chocolate:
In a microwave-safe bowl, mix chocolate chips with coconut oil. Microwave in 30-second bursts, stirring in between until it’s completely melted and smooth. This will make your chocolate nice and shiny!
7. Assemble the Cups:
Pour the melted chocolate over each cup, ensuring that it covers the toppings completely and reaches the edges. Tap the pan lightly on the counter to smooth out the tops and release any air bubbles.
8. Optional Toasted Marshmallow Topping:
If you’re feeling fancy, lightly toast the marshmallow tops with a kitchen torch for that classic s’mores appearance.
9. Chill and Set:
Refrigerate the peanut butter cups for at least 1 hour or until the chocolate has completely set. This will keep everything tidy and make them easier to serve!
10. Serve:
Finally, remove the cups from the muffin tin and peel away the liners. Enjoy your delicious, gooey S’mores Peanut Butter Cups with friends and family!
These tasty treats combine the best flavors of s’mores and peanut butter cups in every bite. Your friends will love them!
Can I Use Almond or Cashew Butter Instead of Peanut Butter?
Absolutely! Almond or cashew butter can be used for a different flavor profile. Just keep in mind that it will slightly change the taste of your s’mores peanut butter cups, but they’ll still be delicious!
How Should I Store Leftovers?
Store any leftovers in an airtight container in the fridge for up to a week. Just make sure to separate layers with parchment paper to prevent sticking!
Can I Make This Recipe Vegan?
Yes! You can make vegan swaps by using dairy-free chocolate, almond or cashew butter, and vegan marshmallows. For the caramel, look for a plant-based option or make your own to keep it totally vegan.
What Size Muffin Tin Should I Use?
A standard 12-cup muffin tin works perfectly for this recipe. If you want smaller portions, a mini muffin tin can work too; just adjust the baking time and chilling period accordingly!