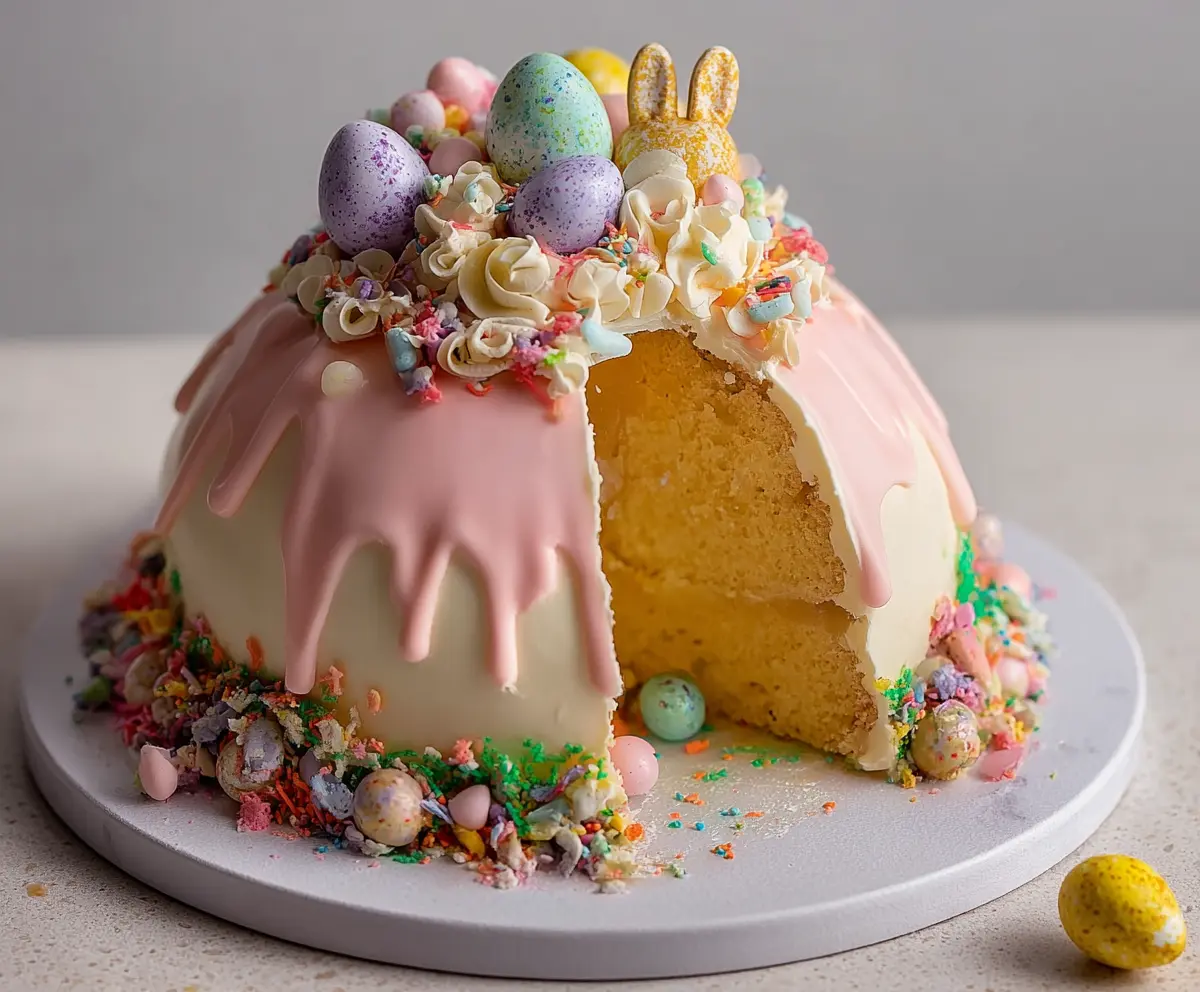
This Epic Easter Egg Smash Cake is a fun and colorful treat! It’s a chocolate cake filled with creamy frosting and topped with surprise candy eggs. Who wouldn’t want to break open a cake for a sweet surprise?
The best part? Watching it get smashed open brings smiles and laughter. I’m not gonna lie, I might sneak a bite before the big smash—it’s too tasty to resist! 😄
Key Ingredients & Substitutions
All-purpose flour: This is the base for the cake. You can substitute with cake flour for a lighter texture or a gluten-free blend if you need to avoid gluten.
Unsalted butter: It’s crucial for flavor and texture. If you’re short on butter, you can use a vegan alternative like margarine or coconut oil, but it may slightly alter the taste.
Granulated sugar: For sweetness, granulated sugar works best. You can swap it out with brown sugar for a richer flavor or a sugar substitute if needed, but they may change the texture.
Whole milk: This adds moisture to the cake. If you’re lactose intolerant, almond milk or oat milk can be great substitutes, though you might want to add a tablespoon of vinegar for acidity.
Heavy cream: Used in both the buttercream and glazes, heavy cream gives a rich consistency. For a lighter alternative, you could use half-and-half or coconut cream.
How Do You Get a Perfectly Smooth Buttercream Frosting?
Making buttercream frosting that’s smooth and creamy takes practice but here are my tips. Start with softened butter to ensure it blends easily. Gradually add the powdered sugar to the butter and keep mixing until it’s fluffy, which usually takes about 5 minutes.
- Use a stand mixer or a handheld mixer for best results.
- Add heavy cream to adjust the consistency; don’t feel shy to add more until it reaches your desired smoothness.
- If it’s too runny, add a bit more powdered sugar!
What’s the Trick for a Beautiful White Chocolate Glaze?
Getting that silky white chocolate glaze just right can be tricky. Heat the heavy cream, but don’t let it boil. Pour it over the chocolate and let it sit; this helps melt it without cooking. Stir gently until combined, ensuring you don’t add air bubbles.
- Let the glaze cool slightly before pouring; this thickens it up just enough to create those lovely drips.
- If it hardens too much, gently reheat it in short bursts.
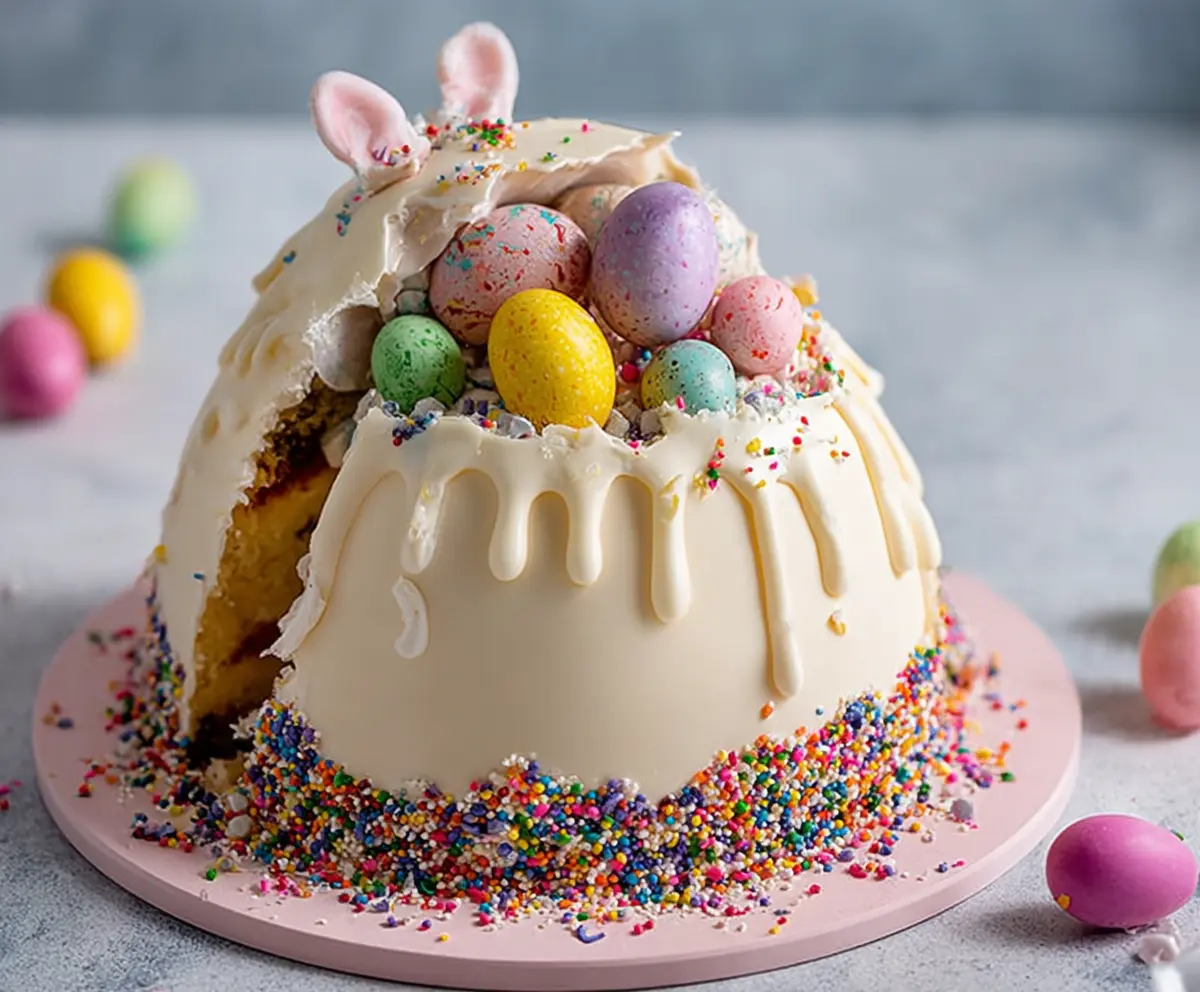
How to Make an Epic Easter Egg Smash Cake!
Ingredients You’ll Need:
For the Cake:
- 2 ½ cups all-purpose flour
- 2 ½ tsp baking powder
- ½ tsp salt
- 1 cup unsalted butter, softened
- 1 ¾ cups granulated sugar
- 4 large eggs
- 1 tbsp vanilla extract
- 1 cup whole milk
For the Buttercream Frosting:
- 1 ½ cups unsalted butter, softened
- 5 cups powdered sugar, sifted
- 2 tsp vanilla extract
- 4-6 tbsp heavy cream or milk
- Pinch of salt
For the White Chocolate Glaze:
- 8 oz white chocolate, chopped
- ½ cup heavy cream
For the Pink Drip:
- ½ cup white chocolate melts or candy melts (pink)
- 1-2 tbsp heavy cream
- Pink food coloring (if needed to adjust color)
Decorations:
- Speckled candy eggs (chocolate or candy-coated)
- Easter-themed candies (mini eggs, bunny shapes, etc.)
- Colored sprinkles (varied shapes and sizes)
- Edible flowers or piped buttercream flowers (optional)
How Much Time Will You Need?
You’ll need about 1 hour and 15 minutes to prepare the cake, plus around 20 minutes for baking, and it’s best to allow additional chilling time for the frosting and glazes. All in all, set aside about 2-3 hours for making this fun and festive cake.
Step-by-Step Instructions:
1. Preheat and Prepare the Pan:
First, preheat your oven to 350°F (175°C). Take your dome-shaped or bundt cake pan and grease it well, then dust it lightly with flour to prevent sticking. This will give the cake a beautiful shape!
2. Mix the Dry Ingredients:
In a medium bowl, whisk together the flour, baking powder, and salt. This will ensure those ingredients are evenly distributed in your cake. Set this bowl aside for now.
3. Cream Butter and Sugar:
In a large mixing bowl, use an electric mixer to beat together the softened butter and granulated sugar. Mix on medium speed for about 4-5 minutes until it becomes light and fluffy. This step is important for a deliciously textured cake!
4. Add Eggs and Vanilla:
Now, add the eggs one at a time, mixing well after each addition. Once all the eggs are in, mix in the vanilla extract for that lovely flavor.
5. Combine Dry Ingredients and Milk:
Reduce the mixer speed to low, and start adding the dry ingredient mixture and the milk alternately in three parts. Begin and end with the dry ingredients, mixing until just combined. Don’t over mix—it’s okay if there are a few lumps!
6. Bake the Cake:
Pour the cake batter into your prepared pan, smoothing the top with a spatula. Pop it in the oven and bake for 45-55 minutes. To check if it’s done, stick a toothpick into the center; it should come out clean! Once done, let the cake cool in the pan for 15 minutes before transferring it to a wire rack to cool completely.
7. Make Buttercream Frosting:
While the cake cools, you can prepare the buttercream frosting. In a clean bowl, beat the softened butter until creamy. Gradually add the sifted powdered sugar, one cup at a time, mixing well after each addition. Finally, stir in the vanilla, salt, and enough heavy cream to achieve a smooth consistency.
8. Prepare the White Chocolate Glaze:
To make the white chocolate glaze, heat the heavy cream in a small saucepan over medium heat until it just begins to simmer. Pour this hot cream over the chopped white chocolate and let it sit for about 2 minutes. Then, stir until the chocolate is fully melted and smooth. Allow it to cool slightly to thicken.
9. Level the Cake:
If the top of your cake has domed too much, carefully trim the base to make it level. This helps when frosting!
10. Crumb Coat:
Spread a thin layer of buttercream frosting over the entire cake to seal in the crumbs. Chill it in the refrigerator for 20 minutes to set.
11. Frost the Cake:
After chilling, apply a thicker layer of buttercream frosting to the cake, smoothing it out with a spatula until it looks neat and even.
12. Drizzle with White Chocolate Glaze:
Now, pour the white chocolate glaze over the top of the cake, allowing it to drip down the sides for a nice, smooth finish.
13. Prepare the Pink Drip:
To make the pink drip, melt the pink chocolate melts with heavy cream in the microwave, stirring in short bursts. Once smooth, add a few drops of pink food coloring if needed to achieve your desired shade.
14. Apply the Pink Drip:
Using a spoon or a piping bag, carefully add the pink drip along the edge of the cake, letting it flow down onto the white glaze for a beautiful effect.
15. Pipe Swirls:
Fit a piping bag with a star tip and fill it with buttercream. Pipe decorative swirls on top of the cake to give it an extra special touch!
16. Decorate for Easter:
Top the cake with your decorative goodies! Scatter speckled candy eggs, mini Easter candies, colorful sprinkles, and any edible flowers or buttercream flowers you wish to add. Get creative and make it festive!
17. Serve and Enjoy:
It’s time for the fun part! You can either slice the cake or go all out by smashing into it for a lively Easter celebration! Enjoy your delicious creation!
Can I Use a Different Type of Pan for This Cake?
Absolutely! While a dome-shaped or bundt pan gives that fun shape, you can use two 9-inch round cake pans instead. Just keep an eye on the baking time, as they may cook quicker—check for doneness at around 30-35 minutes.
How to Store Leftover Cake?
Store any leftover cake in an airtight container at room temperature for up to 3 days. If you prefer, you can refrigerate it, which can extend its freshness up to a week. Just be sure to bring it to room temperature before serving for the best taste!
Can I Make This Cake in Advance?
Yes! You can bake the cake a day ahead and store it wrapped in plastic wrap at room temperature. Frost it the day you plan to serve to keep it looking fresh and delicious, especially with the drips and decorations!
What If My Buttercream Is Too Thick or Runny?
If your buttercream is too thick, you can gradually add more heavy cream or milk, a tablespoon at a time, until it reaches your desired consistency. If it’s too runny, simply incorporate more powdered sugar until it’s smooth and spreadable.