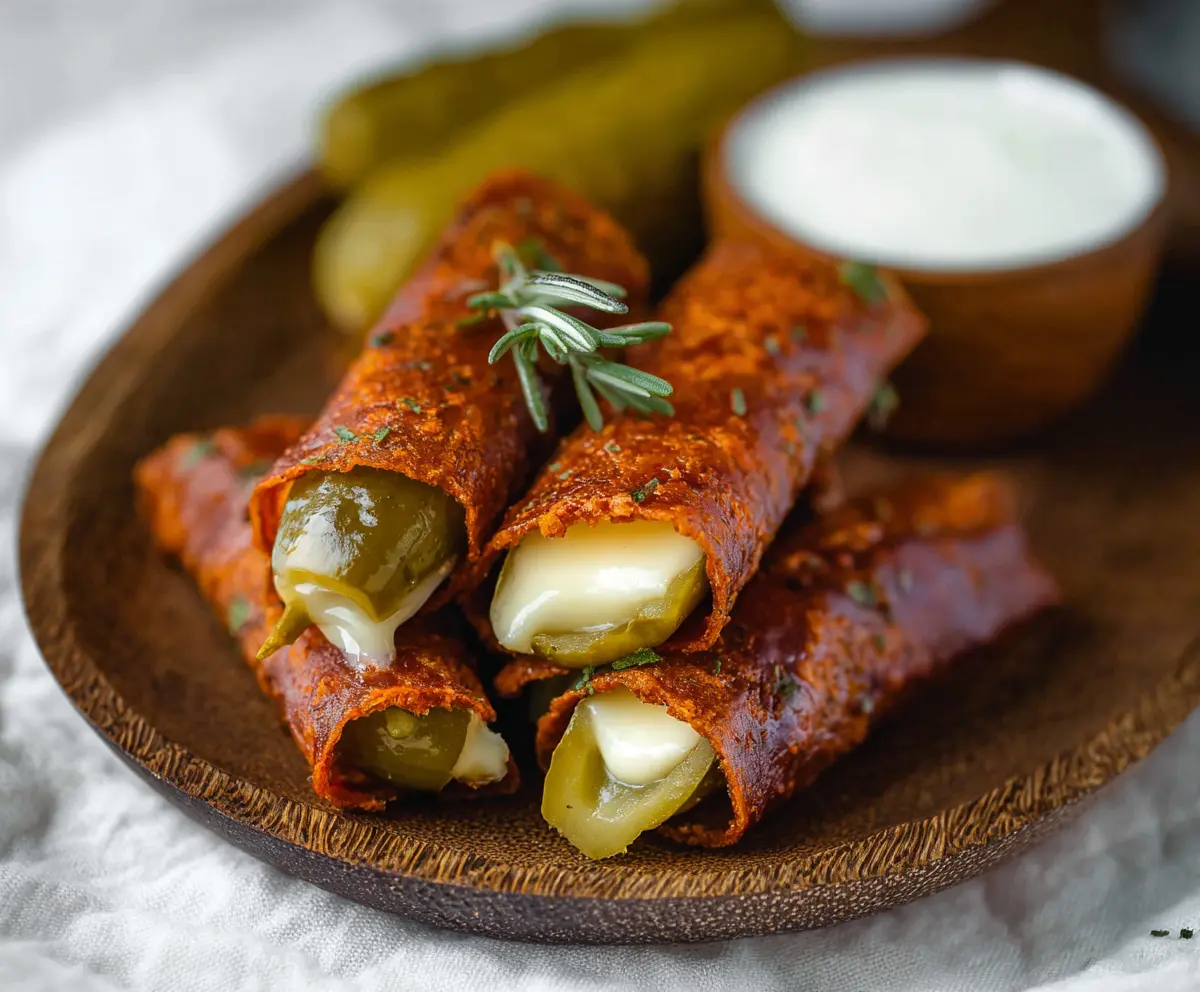
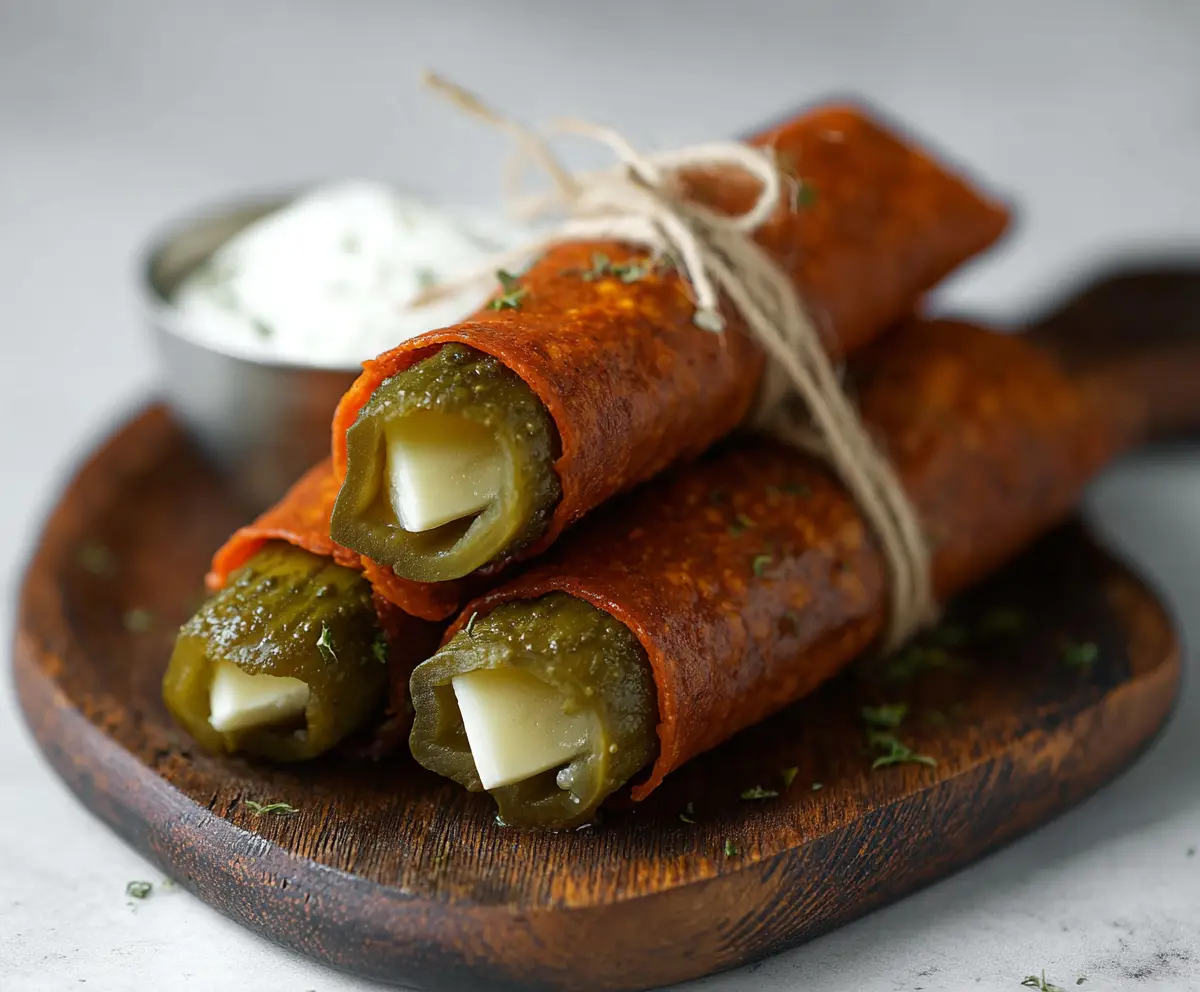
Cheese Wrapped Pickles are a fun and tasty snack! Just take a crunchy pickle and wrap it in creamy cheese. It’s a perfect mix of tangy and cheesy that will make your taste buds smile.
These little treats are super easy to make, and they disappear fast at parties! I like to serve them with toothpicks so everyone can grab one. Get ready for some happy snacking! 😄
Key Ingredients & Substitutions
Dill Pickles: Small to medium-sized dill pickles work best for this recipe. If you don’t have dill, try bread-and-butter pickles for a sweeter twist. Just make sure they’re firm so they hold up well when wrapped!
Pepper Jack Cheese: This cheese brings a nice kick! If spice isn’t your thing, use cheddar or mozzarella. For added flavor, sprinkle a bit of chili powder in with cheddar, or try cream cheese for a creamier texture.
Olive Oil: This is used for greasing the baking sheet. You can substitute it with cooking spray or melted butter if that’s what you have on hand. Both will help the cheese from sticking!
Smoked Paprika: This adds a lovely smoky flavor. If you don’t have it, regular paprika will work too, or even cayenne for some heat! Just be careful with the quantity if you prefer a milder taste.
How Do I Roll Cheese Around Pickles Without It Breaking?
The key to rolling the cheese around the pickles is timing. You need to work quickly when the cheese has just come out of the oven. Here are some tips:
- Use a thin layer of cheese and ensure it is completely melted and slightly crispy on the edges.
- Position the pickle at the edge of the cheese round for easier rolling.
- Roll gently but firmly so the cheese wraps around nicely without tearing.
- Hold the rolled pickle for a moment to help it set before placing it down.
Practice makes perfect! Don’t stress if the first one isn’t perfect. Enjoy the process, and your cheesy pickles will still turn out delicious!
How to Make Cheese Wrapped Pickles
Ingredients You’ll Need:
For the Cheese Wrapped Pickles:
- 10 dill pickles (small to medium size, whole)
- 1 ½ cups shredded pepper jack cheese (or cheddar with a bit of chili powder for spice)
- 1 tbsp olive oil (for greasing)
- 1 tsp smoked paprika
- 1 tsp dried parsley (optional garnish)
- Ranch or sour cream for dipping (optional)
How Much Time Will You Need?
Making Cheese Wrapped Pickles takes about 10 minutes of prep time and 5-10 minutes of baking time. Set aside a little extra time to let them cool before serving. In total, plan for around 20 minutes for this tasty snack!
Step-by-Step Instructions:
1. Prepping Your Oven and Baking Sheet:
Start by preheating your oven to 400°F (200°C). While it heats up, line a baking sheet with parchment paper, so the cheese doesn’t stick. Use a little olive oil to lightly grease the paper—this helps everything come off easily later!
2. Drying the Pickles:
Take your dill pickles and pat them dry with paper towels. This step helps keep the cheese attached and prevents excess moisture from making everything soggy.
3. Preparing the Cheese Mounds:
On the prepared baking sheet, sprinkle small mounds of shredded cheese, keeping them about 3-4 inches apart. Using your fingers or a spatula, gently spread each mound into a thin, round shape. This is important because the thinner the cheese, the easier it will be to wrap around the pickles!
4. Seasoning for Flavor:
To add some extra flavor, sprinkle a bit of smoked paprika over each cheese circle. This will give your wraps a delicious smoky taste and beautiful color once baked.
5. Baking the Cheese:
Now, pop the baking sheet in the oven and bake the cheese for about 5 minutes. You want the cheese to melt completely and start to turn golden around the edges. Keep an eye on it—oven times can vary!
6. Rolling the Pickles:
When the cheese is ready, take the baking sheet out of the oven. Quickly, but carefully, place one pickle at the edge of a cheese round and roll it up. The cheese should be hot and pliable, making it easy to wrap around the pickle. Hold it for a moment to help it set before placing it flat on the baking sheet.
7. Completing the Wraps:
Continue this process with the remaining pickles and cheese rounds. Don’t be afraid to get creative or mix up the flavors!
8. Adding Garnish:
If you’re feeling fancy, sprinkle a little dried parsley over the top of your cheese wrapped pickles for a fresh look. It adds a nice touch of color too!
9. Ready to Serve:
Now it’s time for the fun part—serve your Cheese Wrapped Pickles warm! Offer ranch or sour cream on the side for dipping, and enjoy the delightful crunch and creaminess in every bite. These make for an unforgettable snack or appetizer! Enjoy!
Can I Use Different Types of Cheese?
Absolutely! While pepper jack cheese adds a nice kick, you can use cheddar, mozzarella, or even cream cheese for a milder flavor. Just keep in mind that the melting properties might vary slightly!
What Should I Do If the Cheese Doesn’t Stick to the Pickles?
If the cheese isn’t sticking well, make sure the pickles are thoroughly dried before wrapping. If needed, you can also add a thin layer of cream cheese to help the cheese adhere better.
Can I Make These Ahead of Time?
Yes! You can prepare the cheese mounds and wrap the pickles ahead of time. Just store them in the fridge and bake them right before serving. This keeps them fresh and crispy!
How Do I Store Leftovers?
If you have any leftovers, store them in an airtight container in the fridge for up to 2 days. When you’re ready to enjoy them again, simply reheat in the oven at 350°F (175°C) until warmed through to retain the crispy texture.