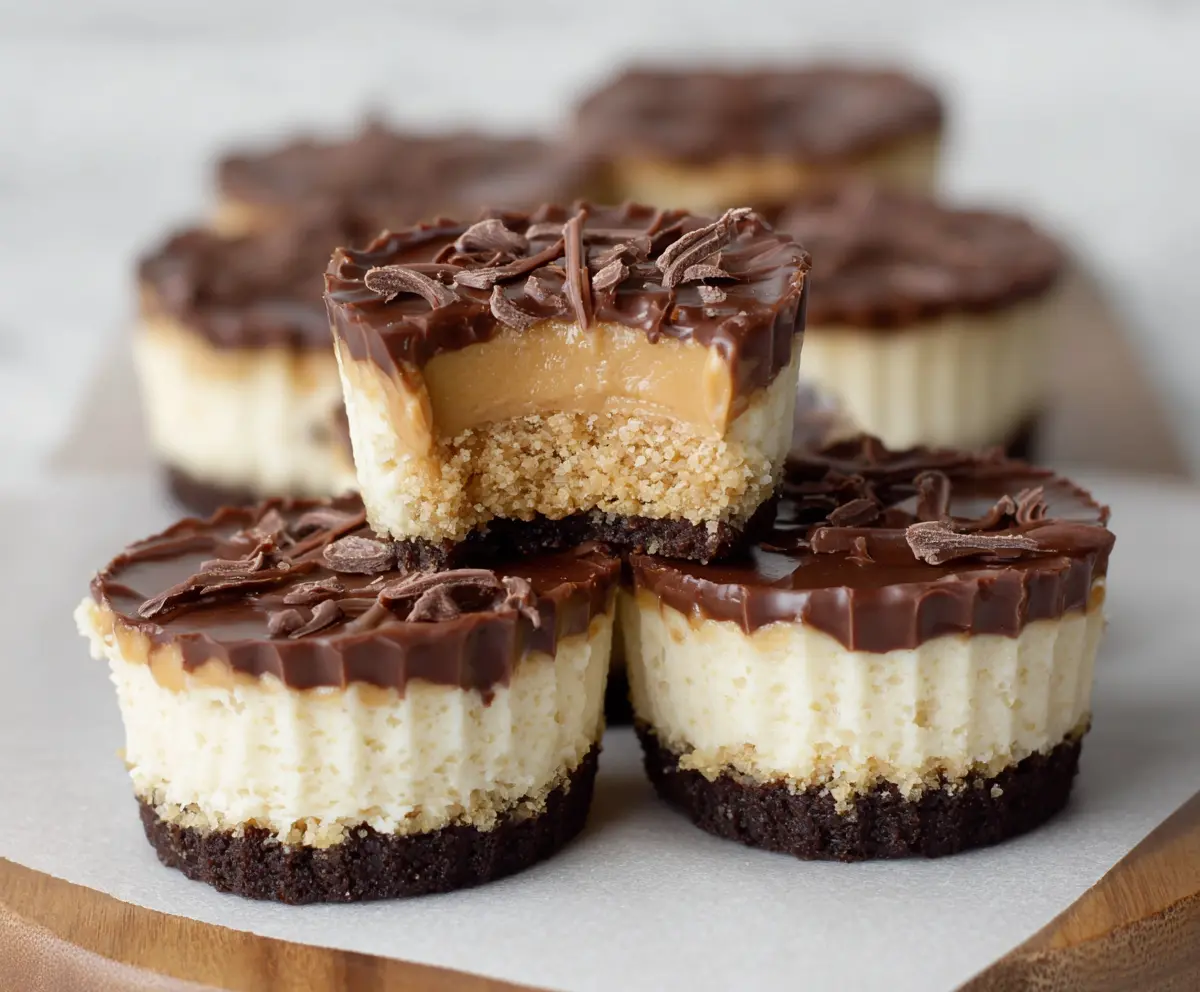
These Peanut Butter Cheesecake Bites are the perfect treat for peanut butter lovers! They are small, creamy, and packed with nutty flavor, making them a delightful snack!
Honestly, they disappear fast at my house. I love popping one in my mouth while pretending I won’t eat five more! 🤭 They’re super simple to make, too—mix, chill, and enjoy!
Key Ingredients & Substitutions
Chocolate Cookie Crumbs: Oreos are a go-to for the crust, but any chocolate cookie will work. If you prefer a less sweet option, try using digestive biscuits for a slightly less sweet crust.
Cream Cheese: Full-fat cream cheese gives the best flavor and texture. If you’re looking for a lighter option, use reduced-fat cream cheese, but the bites might not be as creamy.
Peanut Butter: I love creamy peanut butter for smoothness. If you’re hosting anyone with nut allergies, sunbutter (made from sunflower seeds) works well as a substitute!
Granulated Sugar: For a less sweet version, consider using coconut sugar or a sugar substitute like Stevia to fit your dietary needs.
Chocolate Chips: Semi-sweet chocolate is ideal for balancing sweetness. For a healthier option, try dark chocolate chips instead!
How Do I Bake Perfect Cheesecake Bites?
The biggest challenge with cheesecake bites is achieving the right texture. Start with your oven set to the correct temperature; the baking time is key. Do not overbake! They should be set around the edges and slightly jiggly in the center. This will firm up nicely in the fridge.
- Line your muffin tin with cupcake liners for easy removal.
- Press the cookie crumbs firmly into the bottom of each liner for a solid base.
- Mix the cream cheese mixture until smooth and creamy to avoid lumps.
- Let the bites cool completely before adding the chocolate topping to prevent melting.
- Chill the bites well – a few hours in the fridge is best for the ideal texture.
These tips will help ensure you get soft, creamy, and perfectly set cheesecake bites every time!

Peanut Butter Cheesecake Bites
Ingredients
For the Crust:
- 1 1/2 cups chocolate cookie crumbs (such as Oreos, finely crushed, cream removed)
- 2 tbsp unsalted butter, melted
For the Middle Layer:
- 1/2 cup finely crushed graham crackers or finely ground nuts
For the Cheesecake Filling:
- 8 oz (225 g) cream cheese, softened
- 1/3 cup granulated sugar
- 1/2 tsp vanilla extract
- 1 large egg
- 1/2 cup creamy peanut butter (smooth)
For the Chocolate Topping:
- 1 cup semi-sweet chocolate chips
- 1 tbsp unsalted butter
- Chocolate shavings or curls, for garnish (optional)
How Much Time Will You Need?
This recipe takes about 20 minutes for preparation and then 20 minutes to bake. After baking, you’ll need 2-3 hours for chilling in the refrigerator. So, plan on about 3 hours and 40 minutes total, with most of that time being hands-off while they set firm in the fridge!
Step-by-Step Instructions
1. Prepare the Oven and Muffin Tin:
First, preheat your oven to 325°F (163°C). Grab a standard muffin tin and line it with 12 cupcake liners. This will help with easy removal later on!
2. Make the Crust:
In a medium bowl, combine the chocolate cookie crumbs and melted butter. Give it a good stir until all the crumbs are moistened. Then, press about one tablespoon of this mixture firmly into the bottom of each muffin liner to form the delicious crust. Set this aside for now.
3. Add the Middle Layer:
In another bowl, mix the finely crushed graham crackers (or nuts) with a tablespoon of melted butter until they have a crumbly but slightly sticky texture. Now, press about a teaspoon of this mixture evenly on top of each crust you made earlier. This adds a nice little crunch!
4. Prepare the Cheesecake Filling:
In a large bowl, beat together the cream cheese, sugar, and vanilla extract until smooth and creamy. It’s important to make sure there are no lumps! Once that’s done, beat in the egg until it’s well combined.
5. Fold in Peanut Butter:
Gently fold half of the creamy peanut butter into the cheesecake mixture. You want the peanut butter to be swirled in but not completely mixed—those swirls make it pretty!
6. Fill the Muffin Liners:
Spoon or pipe the cheesecake mixture over the cookie crust and graham cracker middle layers in each muffin cup, filling them nearly to the top. Don’t worry, they won’t puff up too much!
7. Bake!
Pop the muffin tin in the oven and bake for 18-20 minutes. Keep an eye on them! You want the centers to be mostly set, but still slightly jiggly. Once done, remove them from the oven and let them cool to room temperature.
8. Add the Chocolate Topping:
While the cheesecake bites cool, melt the chocolate chips and the tablespoon of butter together. You can do this in a microwave-safe bowl in 20-second bursts, stirring in between, until you have a smooth mixture.
9. Complete the Bites:
Once the cheesecake bites are completely cool, spoon a layer of your melted chocolate over the top of each one. Then, add a dollop of the remaining peanut butter, spreading it gently over the chocolate layer.
10. Chill and Garnish:
For the final touch, if you desire, sprinkle with chocolate shavings or curls! Now, cover the bites and pop them in the refrigerator for at least 2-3 hours to firm up fully.
11. Serve and Enjoy!
When you’re ready to enjoy, simply remove the cupcake liners from each bite and treat yourself to these creamy, layered Peanut Butter Cheesecake Bites—perfect for any occasion or just because!
These bite-sized cheesecakes feature a delicious chocolate crust, a creamy peanut butter-infused center, a crunchy layer, and a rich chocolate topping. Enjoy them as a sweet snack or a scrumptious dessert!
Can I Use Different Types of Nut Butters?
Absolutely! While creamy peanut butter is the main star, you can swap it out for almond butter, cashew butter, or even sunflower seed butter if you’re avoiding nuts. Just ensure the texture is creamy for best results!
Can I Freeze These Cheesecake Bites?
Yes, these cheesecake bites freeze well! To freeze, simply place them in an airtight container or freezer bag after they’ve set. They can last up to 2 months. Thaw in the fridge overnight before serving for the best texture.
What Should I Do If My Cheesecake Don’t Set Properly?
If your bites are still jiggly after cooling, they may need a bit more time in the refrigerator. Make sure they cool down completely and then chill again for a bit longer. They should firm up nicely! Also, ensure not to overbake them in the first place for the best results.
Can I Make These Cheesecake Bites Gluten-Free?
Yes! Simply use gluten-free chocolate cookie crumbs and gluten-free graham crackers (or skip the middle layer altogether). Many brands make gluten-free options that will work perfectly!