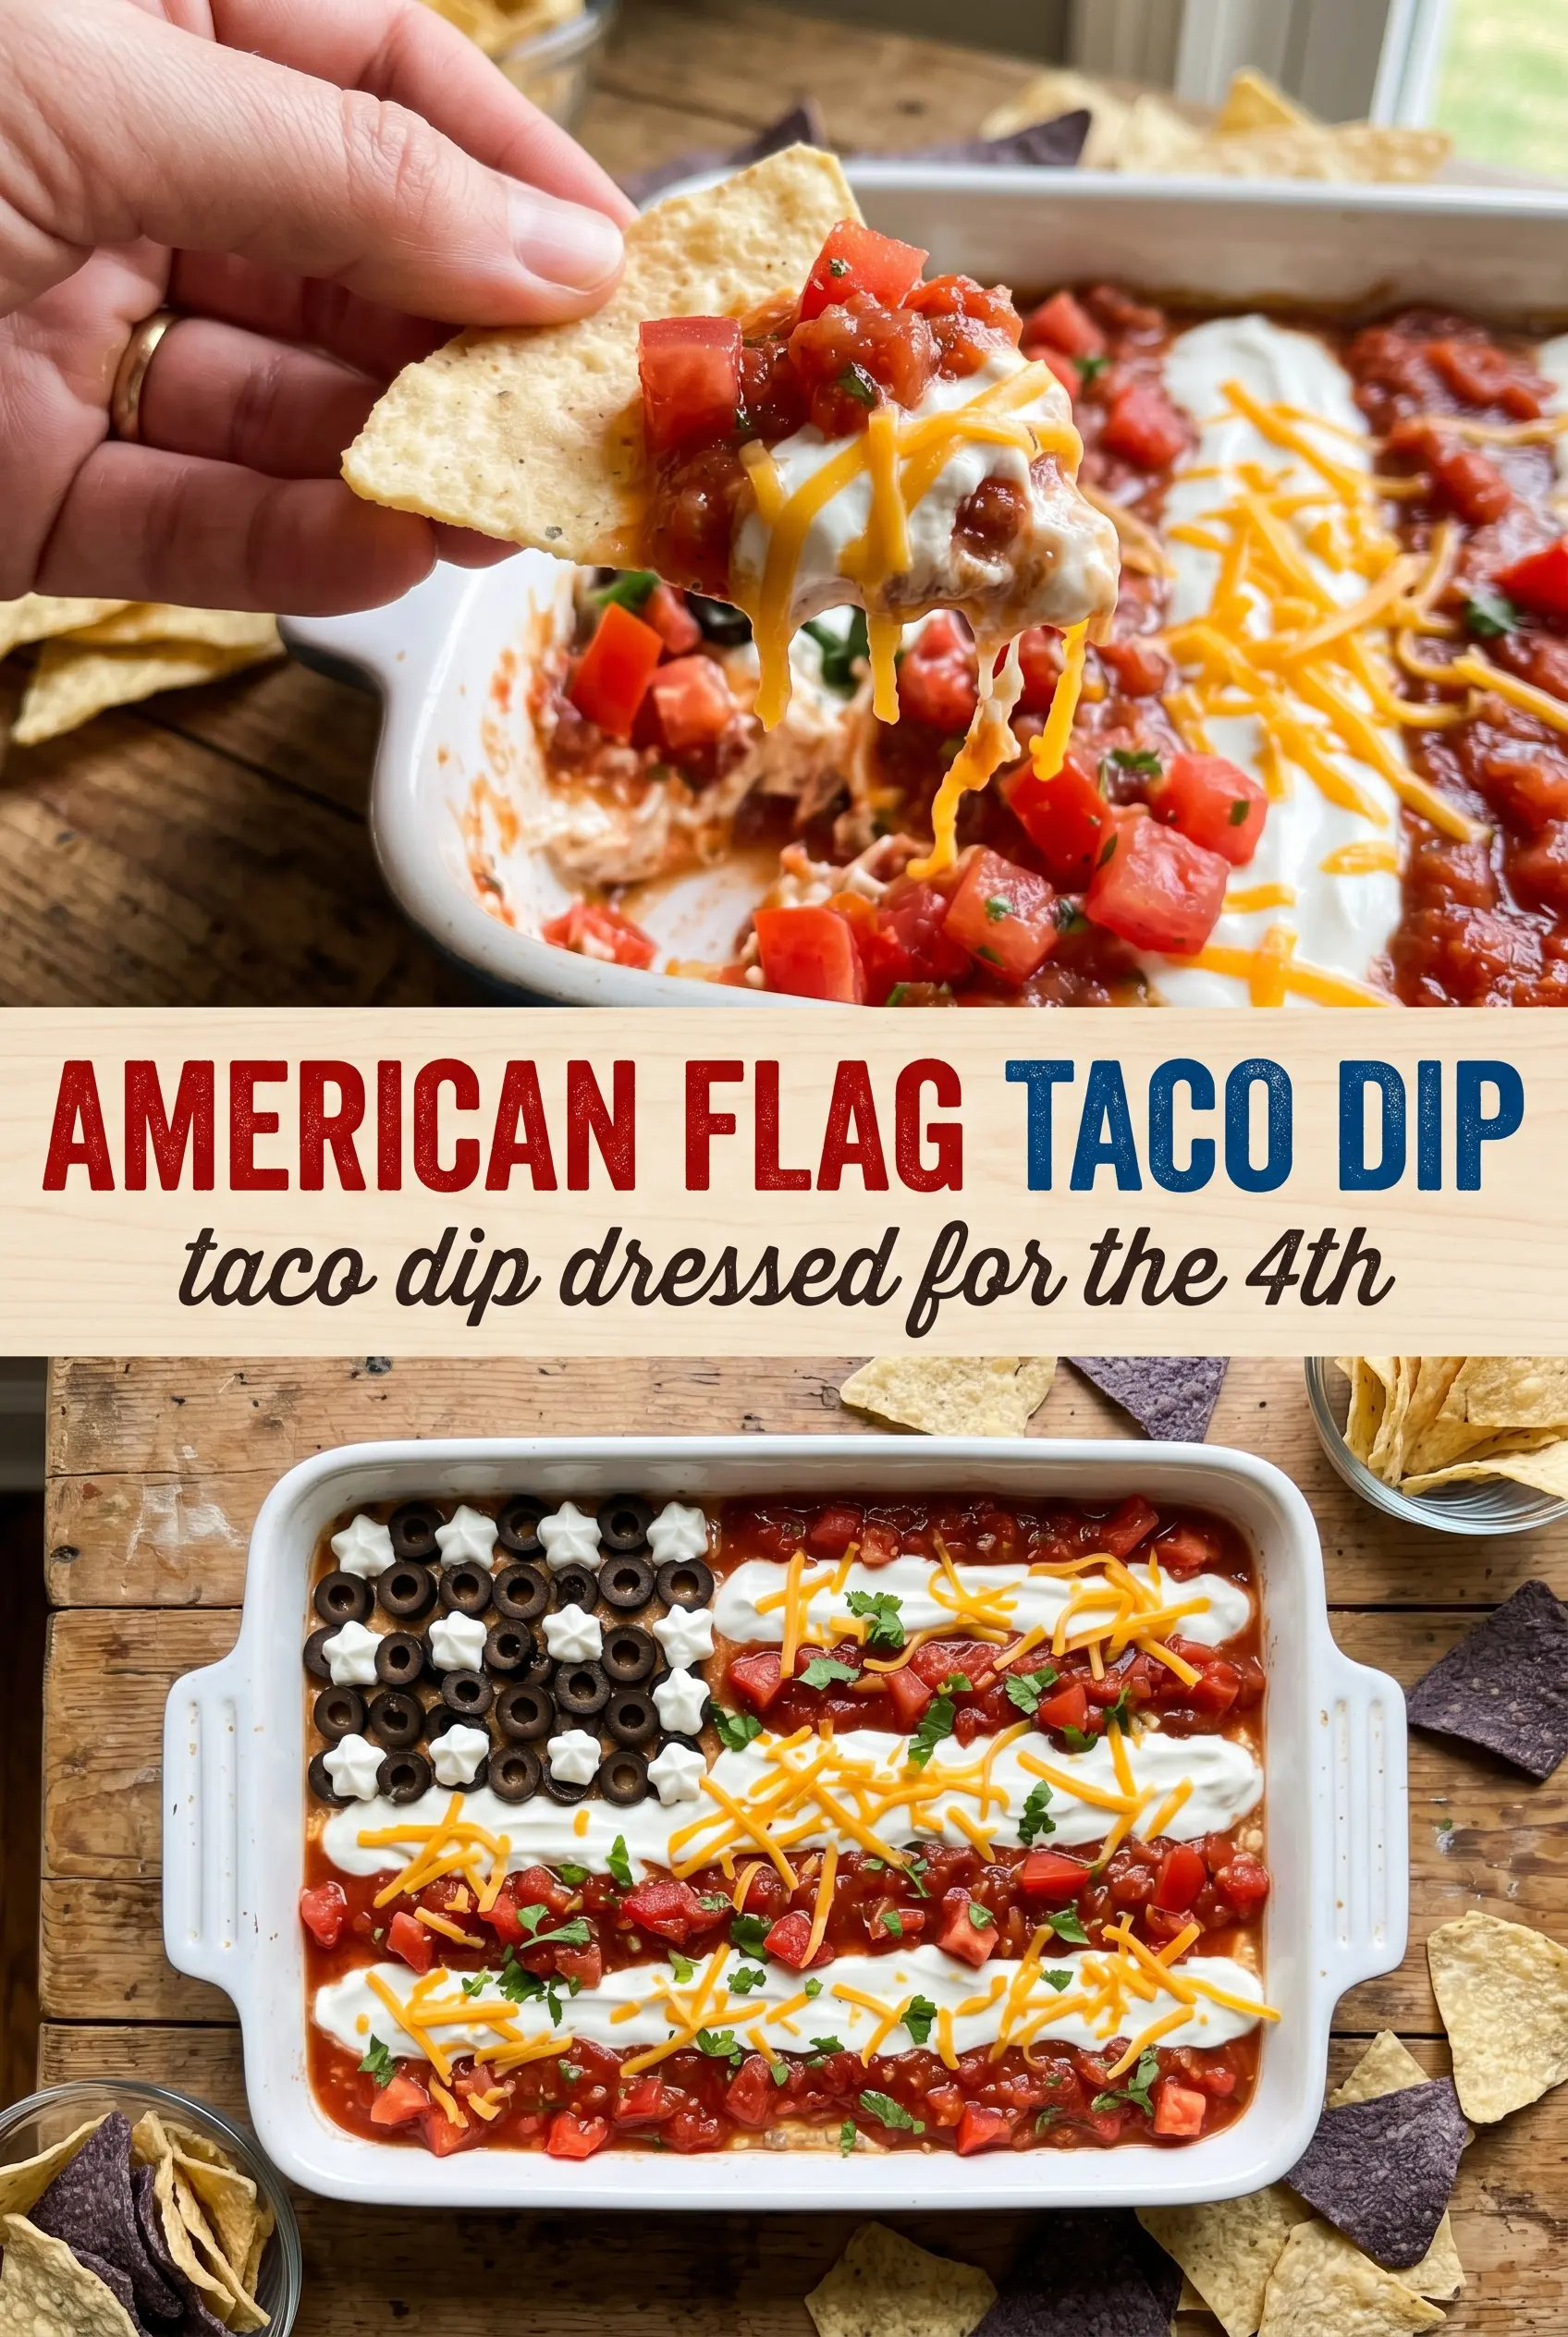
American Flag Taco Dip lands on the table with the kind of bold, party-ready look that gets people reaching for chips before you’ve said a word. It’s layered, creamy, salty, and fresh all at once, with enough structure to hold the flag design without sliding into a messy puddle after the first scoop.
The trick is building it in firm layers and chilling it long enough for the cream cheese base to set up. That step matters more than the decoration. If the base is too soft, the stripes blur together and the whole thing loses its shape the minute you cut into it. Using thick sour cream and a chunky salsa helps the top stay readable, and piping the sour cream instead of spooning it gives you cleaner lines with almost no extra effort.
Below you’ll find the small details that make the flag design work, plus a few swaps if you need to adjust for what’s in the fridge. The dip itself is simple, but the order you layer it in makes all the difference.
The layers held up even after sitting out for a while, and the sour cream stripes stayed neat instead of melting into the salsa. I used the piping bag trick and the flag actually looked like a flag when I brought it out.
Like this layered American Flag Taco Dip? Save it to Pinterest for the next patriotic party when you want a chilled appetizer that looks impressive without turning into extra work.
The Layer That Keeps This Flag Dip from Turning Muddy
The biggest mistake with a layered taco dip is starting with a base that’s too loose. If the beans are spread straight from the can and the cream cheese is still stiff in spots, the layers drag into each other and the finished dip looks sloppier than it should. The fix is simple: soften the cream cheese fully and beat it with the taco seasoning until it spreads like frosting. That gives you a smooth middle layer that anchors everything above it.
Chilling matters here too. The dip doesn’t need baking, but it does need time in the fridge for the cream cheese layer to firm up and for the top to settle. If you skip that rest, the sour cream stripes will slide when you try to serve it and the chips will dig trenches instead of clean scoops.
- Refried beans — These are the structural base. Thicker beans hold the weight of the rest of the layers better than a loose, soupy batch. If yours seem stiff, stir in a spoonful of salsa or water just until spreadable.
- Cream cheese — This is what keeps the center creamy and stable. Full-fat works best because it sets up more firmly after chilling. Low-fat can work, but it won’t hold the same clean layers.
- Taco seasoning — This does the heavy lifting for flavor. A packet is fine here, but if yours runs salty, use a little less and add extra cumin or chili powder to taste.
- Chunky salsa or pico de gallo — Thicker salsa gives you better red stripes and less seepage. Thin, watery salsa will blur the design fast, so drain off excess liquid if needed.
What Each Layer Is Doing in the American Flag Design
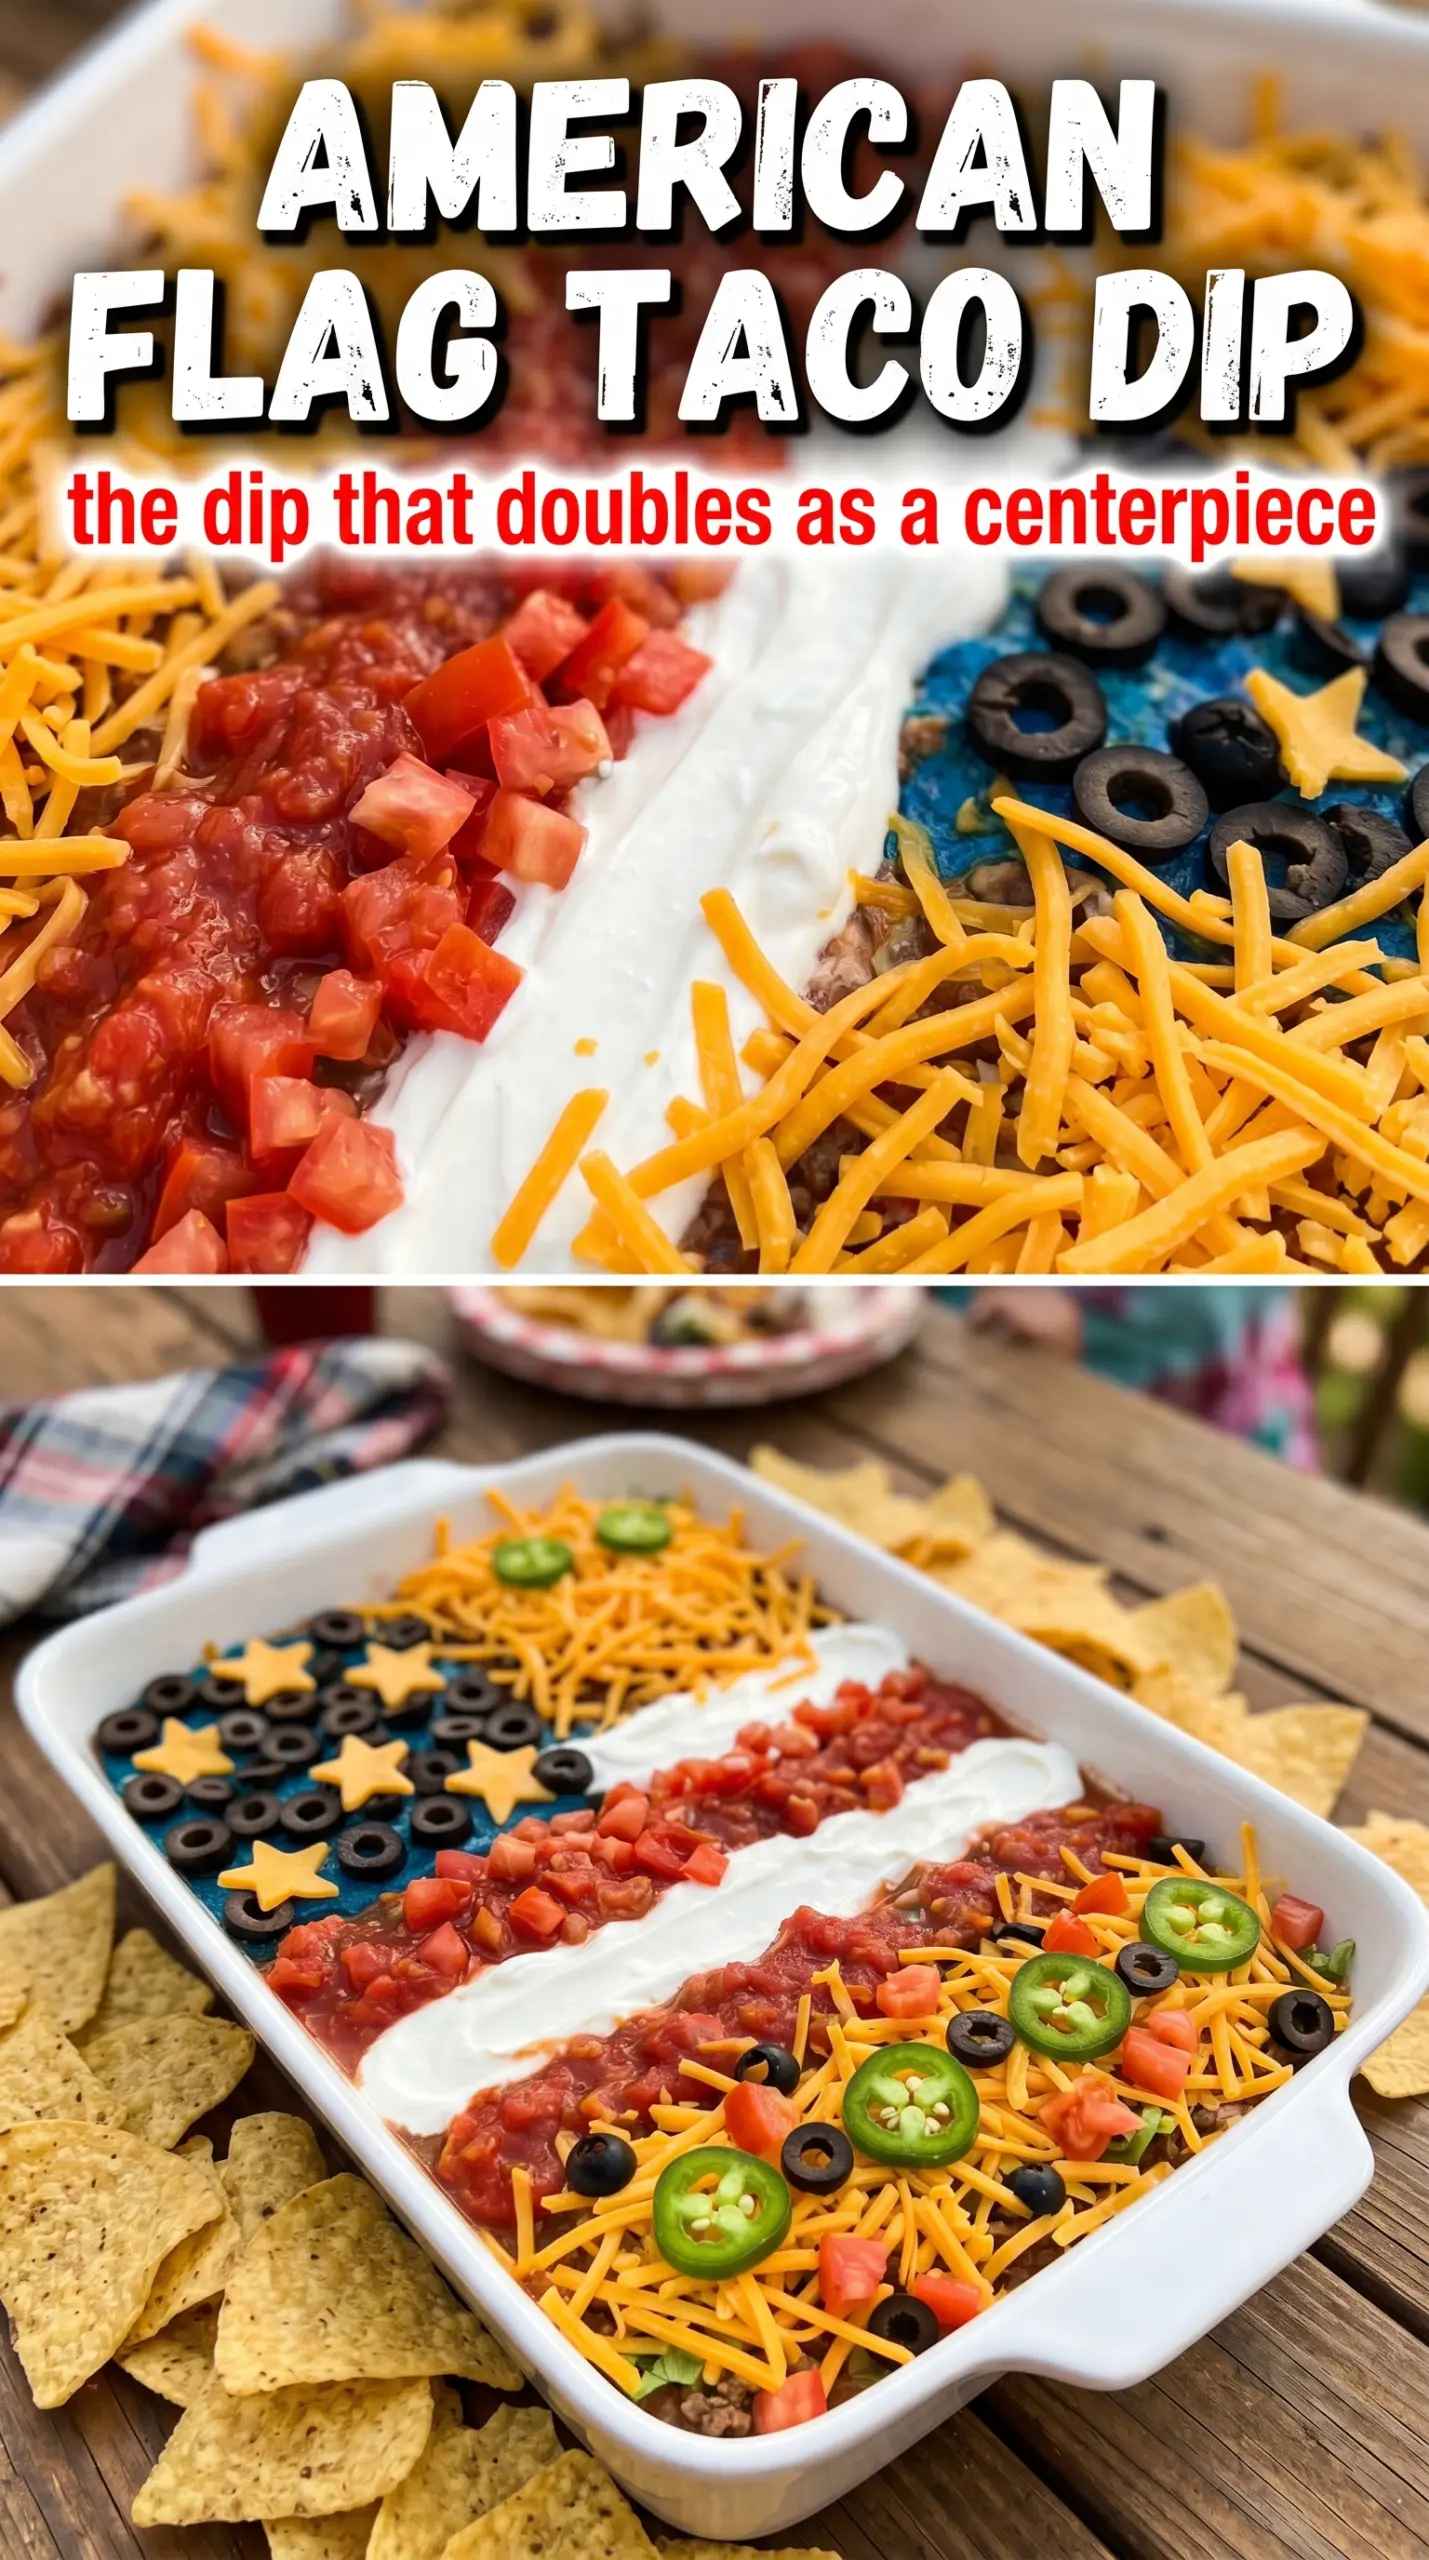
- Guacamole — This gives you a second creamy layer and helps the top stay rich enough to balance the salty beans and cheese. Use good guacamole if you can, because bland guac gets lost under the stronger taco seasoning.
- Shredded Mexican cheese blend — The cheese adds a salty buffer between the creamy layers and the decorative topping. It also helps the surface feel a little less slippery, which makes the stripes easier to place.
- Sour cream — Thick sour cream is what makes the white stripes look sharp. If yours is loose, spoon it into a piping bag and chill it for a few minutes before decorating so it holds its shape.
- Black olives and red tomatoes or bell pepper — These are the color cues that sell the flag design. Slice the olives thin so they pack tightly in the top-left corner, and keep the red pieces small enough to sit between the white stripes instead of rolling off them.
Building the Flag So the Stripes Stay Clean
Setting the Bean Foundation
Spread the refried beans in an even layer all the way to the corners of the dish. A thin layer tears when you scoop it, so press it down with the back of a spoon until it’s level and compact. If your beans are cold and hard to spread, warm them for a few seconds in the microwave and stir before assembling.
Whipping the Cream Cheese Base
Mix the softened cream cheese with the taco seasoning until it looks smooth and glossy, with no pale streaks left behind. Cold cream cheese leaves little lumps that show through the guacamole and make the dip harder to serve cleanly. Spread this layer gently so you don’t drag beans upward into it.
Decorating Without Smearing the Design
After the guacamole and cheese go on, pipe the sour cream stripes across the top instead of spooning them. The cleaner your stripes are here, the clearer the flag will read from a distance. Add the salsa or red tomato rows between the white stripes after the sour cream is in place, then finish with the olive corner and green onions. Chill the whole dish for 30 minutes before serving so the pattern holds when you set the chips beside it.
How to Adjust This Dip for the Party You’re Feeding
Dairy-Free Version with the Same Layered Look
Use dairy-free cream cheese and dairy-free sour cream, then chill the dip a little longer because those substitutes can be softer. The flavor stays in the same taco-dip lane, but the top may not pipe as sharply, so keep the stripes a little wider for a cleaner finish.
Turn It Into a Gluten-Free Party Dip
This is naturally gluten-free as long as your taco seasoning and chips are labeled gluten-free. That matters more than people think, since some seasoning packets use flour or anti-caking additives that can sneak in during the final mix.
Make It Ahead for a Busy Celebration
Assemble the bean, cream cheese, guacamole, and cheese layers a few hours ahead, then add the sour cream stripes, salsa, olives, and green onions closer to serving. The base gets better with a little time in the fridge, but the decorative top stays sharpest when you finish it the same day.
Storage and Reheating
- Refrigerator: Store covered for up to 3 days. The top will soften and the flag design will blur, but the flavor holds up well.
- Freezer: Don’t freeze this dip. The sour cream, guacamole, and cream cheese layers separate after thawing and the texture turns grainy.
- Reheating: This dip is meant to be served cold, so don’t reheat it. If it’s been chilled for a while, let it sit at room temperature for 10 to 15 minutes so the layers scoop cleanly without becoming loose.
Questions I Get Asked About This Recipe
American Flag Taco Dip
Ingredients
Equipment
Method
- Spread refried beans in an even layer across the bottom of a large rectangular baking dish or serving tray, creating a smooth base layer you can stack on. Press gently so the layer is flat for clean stripes on top.
- Mix cream cheese with taco seasoning until smooth, then spread evenly over the bean layer. Keep the layer level so the next toppings adhere in an even coat.
- Spread guacamole over the cream cheese layer, then top with the shredded Mexican cheese blend. Cover the surface thoroughly for a consistent bite in every scoop.
- Spoon sour cream into a piping bag or zip-lock bag with a corner snipped and pipe horizontal white stripes across the top of the dip. Pipe straight lines with light, even pressure so the stripes are recognizable.
- Add rows of salsa or diced red tomato between the sour cream stripes to create the red stripe effect. Keep each row similar in thickness for a clear flag pattern.
- In the upper left corner, arrange sliced black olives tightly to form the blue canton rectangle. Pack them close together so the blue area looks solid rather than spotty.
- Scatter green onions across the top for finishing color, then chill for 30 minutes. This sets the layers and firms the toppings before serving.
- Serve the chilled dip with tortilla chips, letting guests scoop through the layers for the flag look. Keep chips fanned or on the side so they stay crisp.